- SD Card (SD Mode)
- SD Card pins and functions
- SD Card Drive Circuit
- SD Card SD Mode Software
- Functions
- 1-General Purpose Main Functions
- 2-Sector Writing Functions
- 3-Sector Reading Functions
- 4-Sector Erase Functions
- Command Functions
- CMD0 command
- CMD8 command
- CMD55 command
- ACMD41 command
- CMD2 command
- CMD3 command
- CMD9 command
- CMD7 command
- ACMD6 command
- CMD17 command
- CMD18 command
- ACMD23 command
- CMD24 command
- CMD25 command
- ACMD22 command
- CMD32 command
- CMD33 command
- CMD38 command
- CMD12 command
- CMD13 command
- CMD16 command
- CMD56 command
- Information Tables About SD Card
- Application of Functions
- Functions
- SD Card Result
- FAT32 File System
- FAT32 File System Software
- Functions
- 1- Initial Analysis and Format Functions
- 2- Calculation Functions
- 3- File Transaction Functions
- SD_FAT32_DOSYA_OLUŞTUR Function
- SD_FAT32_DOSYA_SEC Function
- SD_FAT32_DOSYA_KLASOR_SIL Function
- SD_FAT32_DOSYA_YENIDEN_ADLANDIR Function
- SD_FAT32_DOSYA_SONUNA_GIT Function
- SD_FAT32_DOSYA_BASINA_GIT Function
- SD_FAT32_DOSYA_TARIH_SAAT_AYARLA Function
- SD_FAT32_DOSYA_DEGISIM_TARIH_SAAT_AYARLA Function
- SD_FAT32_DOSYA_LISTELEME Function
- SD_FAT32_DOSYA_LISTELEME_SONLANDIR Function
- SD_FAT32_DOSYA_VERI_YAZ Function
- SD_FAT32_DOSYA_VERI_OKU Function
- 4- Folder Transaction Functions
- Application of Functions
- Functions
- FAT32 File System Software
- RESULT
- Library Files
- Documents Taken
In this lesson, we will see the use of SD cards (SD Mode) and the microc library I wrote for FAT32. But first I’ll start with the SD card. The SD card and FAT32 are written in the same way for the same library, so we will first go through file operations with FAT32 after learning how to install and use the SD card circuit.
What you will read in this lesson is the only using part of the library that is the result of 22-months study.
SD Card(SD Mode)
- SD cards are a popular data storage medium today. There are many types, such as; microSD, miniSD and so on.
- It is very advantageous that SD cards are very small and doing operation very fast with little energy.
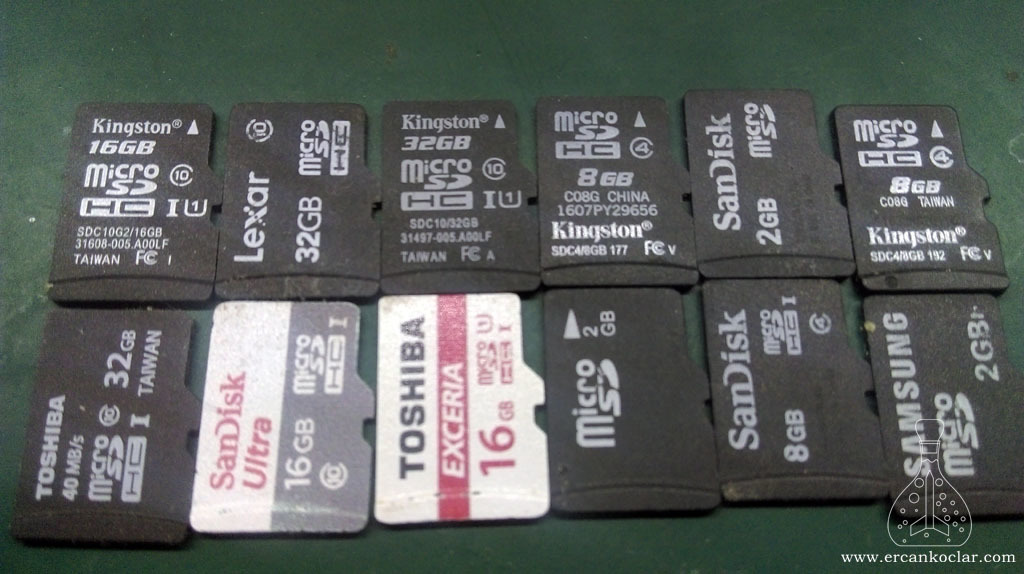
- SD cards can be found in different capacities and in different brands with different features, but the system is always the same even if the brand is different.
- SD cards can be operated in 2 types of mode.
SPI Mode: Serial mode
SD Mode: Parallel mode - Compare the SPI mode and SD mode in the table below
SD Mod |
SPI Mod |
| All pins are used for connection (can only be driven using Data0 if wanted) | Only 3 pins are used for connection |
| Data transfer rate is at least 50 Mhz | Data transfer speed is ? Mhz |
| All data ports (Data0, Data1, Data2, Data3) are used to transfer data. | Data and commands are transferred from the same single pin. |
| The commands and all other operations are very fast because they are made from separate pins. | Since data, commands and responses are made on the same pin, it is very slow. |
| It supports very high speed modes like UHS. | It certainly does not support modes like UHS. |
| CRC provides control, thus the integrity of the data is guaranteed. | There is no CRC check, the data can be recorded as corrupted. |
| SD mode driver codes are sold at high prices (I wrote it for free!) | SPI mode driver codes can be found free of charge. |
- As you can see from the table above, SPI mode is slow and does not work, so libraries that can use this mode are given free of charge.
- I am here to tell you not the SPI mode but the SD mode. Now you can use your SD card very quickly on your circuits!
SD Card Pins and Functions
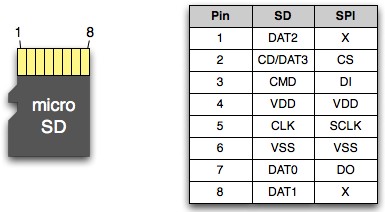
- In the picture above, the pins of the SD card are visible. We will look at the part that says SD because we will use our card in SD Mode.
- It’s a Micro SD card in the picture. With normal SD cards, only the locations of the pins are different. I used MicroSD card because it is small.
- Pins
- DAT2 (data2) :Data2 is the pin and provides data exchange.
- CD/DAT3 (card detect/data3) :Double functional pin. Card Detect checks whether card is present, Data provides data exchange.
- CMD(command) :Command is pin. All commands to the SD card are transmitted over this pin.
- VDD : +3,3v feeder.
- CLK(clock) :We can call the SD card’s heartbeat. Every process is done with these clock steps.
- VSS : GND connector
- DAT0(data0) : Data0 pin. Data exchange is done. In SD mode, if you want, you can cancel the other 3 data ports and exchange data from one port.
- DAT1(data1) : Data1 pin. Data exchange is done.
SD Card Drive Circuit
- To use the SD card, we need a circuit. Keeping in line with the circuit details and written notes will ensure that your circuit works properly.
- SD cards must be supplied with +3.3 volts. otherwise it will deteriorate. “3.3V Regulator Circuit“
- The circuit will work with PIC. The drive circuit must be connected to the PIC. I use PIC18f4620 as PIC.
Circuit diagram
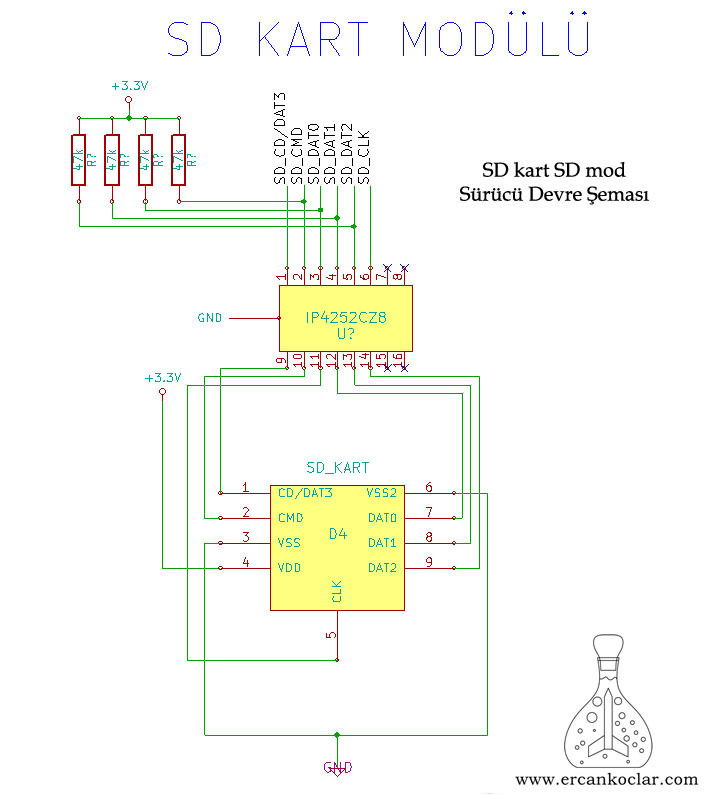
- On the Circuit Board all the written heads going up goes to the PIC.
- All heads are “pulled up”, except the CLK-clock.
- Note that “pull-ups” were made after filtration.
Necessary materials
1. 4 pieces 47K resistor
2. 1 x IP4252CZ8 Passive Filter
3. 1 x SD Card Socket
4. Perforated Pertinaks
Making the Circuit
- NOTE: always use a socket for the SD card. Preferably it is better if you use it from spring sockets.
- NOTE2–IMPORTANT! -: The IP4252CZ8 Passive filter used in the circuit is a part with vital presets. The SD card operates at high speeds, causing excessive noise. For this reason, the data creates problems in reading. This micro-part solves the whole problem. However, since this piece is very small, it is beneficial to solder it with the help of the finest pointed soldering iron and fine copper wires and to stick it afterwards.
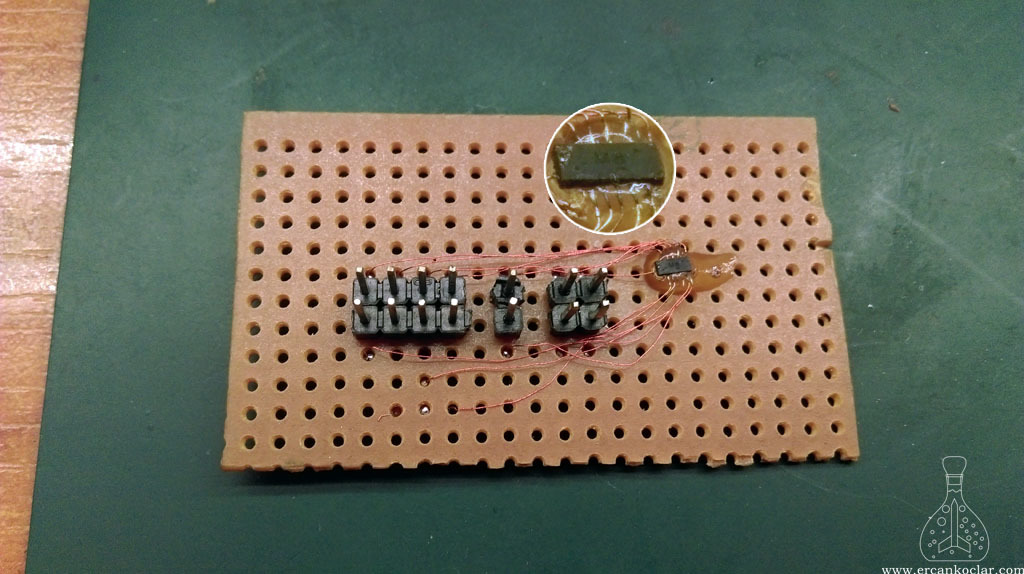
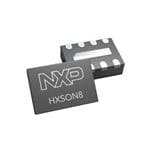
- Passive filter element is visible above. The thin copper wires were tied first, then glued. The thin wires are connected to the pins so they can be transferred to the circuit. Thus, problems such as wire breakage remained.
- This was done this way because the circuit was in the design phase. The circuit will be professionally soldered in the exact state.
- IP4252CZ8 You can buy a passive filter from AliExpress.
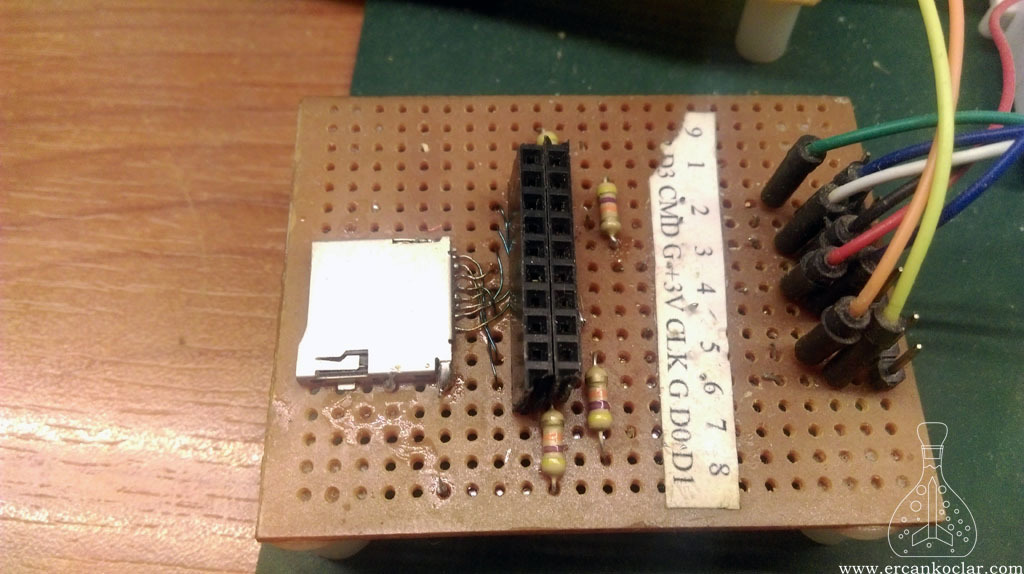
- The circuit is visible in its general state. The female slots are where the passive filter is attached. It will become more useful in this way.
- Pull-up resistors are seen.
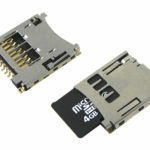
- Micro SD card slot was also connected with the help of thin copper wires. Later, with very little glue, the wires were glued.
- If you use a paper template like myself, you can set up the circuit before you mix the pins in the circuit setup.
- The right jumper wires go directly to the PIC.
- Since the driver circuit is ready, we can switch to writing.
SD Card SD Mode Software
- During my studies I noticed that a really great system was built into the SD cards. There is no other option to say a system can be good like that. I got the ones that would work for us in a very wide system. The current software does not support UHS modes because even UHS I mode is going up to 100MHz and now it is a bit difficult to find the PIC working at that speed. The software is running at standard 50MHz and even this is a high speed for PIC.
- Basically I divide the functions into two functions as “Functional Functions” and “Command Functions”. Functional functions divide into many parts. Here I will describe each function individually, but some functions will be given for informational purposes only. Since the actual usage is in the system, calling from the outside may disrupt the function, but it will still benefit from the point of information.
- Since the SD card library also contains the CRC library, you do not need to add the CRC library.
- There are some constants in the software. Let’s examine these constants because you can not define variables with the same name.
- unsigned long SD_DATA_TAMPONU[128] :All data processing is done via this buffer. The software can be used within another process.
- unsigned long YAZILAN_BLOK_SAYISI=0 :It keeps the number of blocks written. Used in the system.
- unsigned long KART_DURUM=0 :SD Card keeps Status status. Used in the system.
- unsigned int CID[8] : Stores the card’s CID information. User-readable. It will be explained in detail how it is read.
- unsigned int CSD[8] :Stores the card’s CSD information. User-readable. It will be explained in detail how it is read.
- unsigned int RCA_ADRESI=0 :Holds the card’s identifier address.
- unsigned char KART_TIPI=0 :It keeps the information of what the card type is.
- unsigned char VERI_YOLU_GENISLIGI :It keeps the selected data path width.
- unsigned long SD_DATA_TAMPONU[128] :All data processing is done via this buffer. The software can be used within another process.
Functions
- Here we will see the explanations and usage of all functions.
- The system functions are indicated by red and the user functions by green.
1-General Purpose Main Functions
– SD_CLOCK Function
Function : void SD_CLOCK(unsigned char dongu_sayisi)
Purpose :Creates the heartbeat of the SD card. Each command on the SD card is processed with a clock pulse every bit of each command.
Parameters:
- dongu_sayisi :Determines how many times the clock signal will be generated.
Usage :
SD_CLOCK(80);//80 clock signals are sent.
Feedback: It does not return any value since it is a void type.
- System function. Can not be used by the user.
– SD_SDMOD_ANALIZ Function
Founction : unsigned char SD_SDMOD_ANALIZ(unsigned char SD_VERI_YOLU_GENISLIGI)
Purpose :It is used primarily to identify the SD card. First it wakes up the sd card and sends it some commands to gather information about it. There are two options in the parameter that it has.
Parameters:
- SD_VERI_YOLU_GENISLIGI :Specifies whether the SD card will operate in 4-bit mode or 1-bit mode.
- 4 bit mod :It also enables to use 4 data ports.
- 1 bit mod :It uses 1 data port (data0) by activating it.
- Which mode to use is determined at the beginning and can not be changed during operation.
Usage:
SD_SDMOD_ANALIZ(4); // 4 bit mode enabled
Feedback:
- If it returns 1, the operation is successful.
- If it returns 0, it means that no card is found.
- User function. This command should be used at first.
– SD_MOD_VERI_YAZMA_RUTINI_4BIT Function
Function : unsigned char SD_MOD_VERI_YAZMA_RUTINI_4BIT()
Purpose : When the 4-bit mode is selected for the SD card, the software calls this function for all write operations.
Parameter : no.
Usage:
SD_MOD_VERI_YAZMA_RUTINI_4BIT(); // The data write routine to be used when 4-bit mode is enabled.
Feedback:
- If it returns 1, the operation is successful.
- If it returns 0, the operation is unsuccessful.
- System function. Can not be used by the user.
– SD_MOD_VERI_YAZMA_RUTINI_1BIT Function
Function : unsigned char SD_MOD_VERI_YAZMA_RUTINI_1BIT()
Purpose : When 1 bit mode is selected for the SD card, the software calls this function for all write operations.
Parameter : no
Usage:
SD_MOD_VERI_YAZMA_RUTINI_1BIT(); // When 1 bit mode is enabled, only data0 is used in the data writing routine to be used.
Feedback:
- If it returns 1, the operation is successful.
- If it returns 0, the operation is unsuccessful.
- System function. Can not be used by the user.
– SD_MOD_VERI_OKUMA_RUTINI_4BIT Function
Function : unsigned char SD_MOD_VERI_OKUMA_RUTINI_4BIT()
Purpose : When the 4-bit mode is selected for the SD card, the software calls this function for all read operations.
Parameter : no
Usage:
SD_MOD_VERI_OKUMA_RUTINI_4BIT();//The data reading routine to be used when 4-bit mode is enabled.
Feedback:
- If it returns 1, the operation is successful.
- If it returns 255, it means that there is an error in data transfer. The data are corrupted.
- System function. Can not be used by the user.
– SD_MOD_VERI_OKUMA_RUTINI_1BIT Function
Function : unsigned char SD_MOD_VERI_OKUMA_RUTINI_1BIT()
Purpose : When 1 bit mode is selected for the SD card, the software calls this function for all read operations.
Parameter : no
Usage:
SD_MOD_VERI_OKUMA_RUTINI_1BIT();//The data read routine to be used when 1 bit mode is enabled.
Feedback:
- If it returns 1, the operation is successful.
- If it returns 255, it means that there is an error in data transfer. The data are corrupted.
- System function. Can not be used by the user.
2- Sector Writing Functions
– SD_MOD_TEK_BLOK_YAZ Function
Function : unsigned char SD_MOD_TEK_BLOK_YAZ(unsigned long BLOK_ADRESI)
Purpose :The address of the data loaded into the data buffer is written to the given block. Writes single block.
- Note: The data buffer is a “SD_DATA_TAMPONU [128]” long type string. The sum is 512 bytes because at least 512 bytes of data can be written to the SD card (1 block). For this reason, the data to be written must be loaded first. Then write command should be given.
Parameter:
- BLOK_ADRESI :The address of the block to be written is given. The 512 byte data contained in the buffer is transferred to this block.
Usage:
//data transfer to the buffer
//If there are random values in empty sequences, they are transferred as they are.
SD_DATA_TAMPONU[0]=121545;
SD_DATA_TAMPONU[1]=415464;
SD_DATA_TAMPONU[2]=2342342;
SD_DATA_TAMPONU[3]=23432432;
//the write command is given after loading the data to the buffer
SD_MOD_TEK_BLOK_YAZ(3);//write the data to the 3th block
Feedback:
- If it returns 1, the operation is successful.
- If it returns 0, the operation is unsuccessful.
- User function.
2A – Multiple Writing Functions
- Multiple writing functions can be used to send blocks without interrupting consecutive blocks on very large data. However, PIC is not often used because of size and transaction volume.
- The multi-write function consists of 3 sections.
- SD_COKLU_BLOK_YAZ_BASLAT :The address to start writing and the number of blocks to write are given. so the SD card will save time by pre-deleting it here.
- SD_COKLU_BLOK_YAZ_VERIGONDER :The buffer added data is sent. Here the buffer is 512 bytes in size. However, this function can be taken in the “for” loop and the new data can be loaded onto the tampon and sent continuously.
- SD_COKLU_BLOK_YAZ_BITIS:Specifies that the writing process ends on the SD card.
- After the three functions are announced, they will be displayed at the end of the last use.
– SD_COKLU_BLOK_YAZ_BASLAT Function
Function : unsigned char SD_COKLU_BLOK_YAZ_BASLAT(unsigned long BLOK_ADRESI,unsigned long YAZILACAK_BLOK_SAYISI)
Purpose :Starts multiple writes. By specifying the address to start writing and how many blocks to write, the SD card allows you to pre-erase those areas and save time.
Parameter:
- BLOK_ADRESI:Write the address of the block to start the writing process.
- YAZILACAK_BLOK_SAYISI:How many blocks are written is reported.
Feedback:
- If it returns 0, it means there is no card.
- User function.
– SD_COKLU_BLOK_YAZ_VERIGONDER Function
Function : unsigned char SD_COKLU_BLOK_YAZ_VERIGONDER()
Purpose :It sends the loaded data to the buffer.
Parameter : no
Feedback :
- If it returns 0, it means there is no card.
- User function.
– SD_COKLU_BLOK_YAZ_BITIS Function
Function : unsigned char SD_COKLU_BLOK_YAZ_BITIS()
Purpose :Ends multiple writing.
Parameter : no
Feedback :
- If it returns 0, it means there is no card.
- If it returns 1, the operation is successful.
- User function.
Multiple Writing Functions Usage Mode:
SD_COKLU_BLOK_YAZ_BASLAT(10,5);//preparing for multiple writing
// set the value of i to 5 for writing 5 blocks.
for(İ=0;i<5;i++)
  {

     SD_COKLU_BLOK_YAZ_VERIGONDER();data update operation // (any function that updates the data in the temporary buffer)
  }
SD_COKLU_BLOK_YAZ_BITIS();//writing has been ended
- Note: The data update operation can be any function that changes the data buffer. The process will be terminated when the for loop ends, in which 1 block of data is written each time. Multiple write operations must be done according to this template.
3-Sector Reading Functions
– SD_MOD_TEK_BLOK_OKUMA Function
Function : unsigned char SD_MOD_TEK_BLOK_OKUMA(unsigned long BLOK_ADRESI)
Purpose :It reads a single block from the SD card and loads the data into the buffer.
Parameter :
- BLOK_ADRESI:The address of the block to be read is written.
Usage:
SD_MOD_TEK_BLOK_OKUMA(0);// the first block is read.
Feedback:
- If it returns 0, reading has failed.
- If it returns 1, the operation is successful.
- If it returns 255 value , there is distortion in the readout. CRC error
- User function.
3A-Multiple Reading Functions
- Multiple reading functions are used to read block data continuously from the SD card. In each read operation, 1 block of data, ie 512 bytes, is written in the data buffer. The user will find the data that is read here. After this data is evaluated, a new read operation must be performed, otherwise the newly read data will be overwritten.
- The multi-read function consists of 3 sections.
- SD_COKLU_BLOK_OKUMA_BASLAT :The address at which the reading begins is written.
- SD_COKLU_BLOK_OKUMA_VERIOKU :It reads the blocks in succession and writes the read values to the data buffer.
- SD_COKLU_BLOK_OKUMA_BITIS:Informs the SD card that whole reading is finished.
- After the three functions are explained, they will be displayed in use mode finally.
– SD_COKLU_BLOK_OKUMA_BASLAT Function
Function : unsigned char SD_COKLU_BLOK_OKUMA_BASLAT(unsigned long BLOK_ADRESI)
Purpose :Gives the SD card the block address to read and prepares the card to read.
Parameter :
- BLOK_ADRESI:Address of the block to start reading.
Feedback:
- If it returns 0, it means there is no card.
- User function.
– SD_COKLU_BLOK_OKUMA_VERIOKU Function
Function : unsigned char SD_COKLU_BLOK_OKUMA_VERIOKU()
Purpose :From the specified address, block block data from the SD card is written into the data buffer.
Parameter : no
Feedback :
- If it returns 0, reading has failed.
- If it returns 1, the operation is successful.
- If it returns the 255 value backwards, there is distortion in the readout. CRC error
- User function.
– SD_COKLU_BLOK_OKUMA_BITIS Function
Function : unsigned char SD_COKLU_BLOK_OKUMA_BITIS()
Purpose :Informs the SD card that reading has ended.
Parameter : no
Feedback :
- If it returns 0, it means there is no card.
- User function.
Multiple Reading Functions Usage Mode:
SD_COKLU_BLOK_OKUMA_BASLAT(100);//multiple reading starting addresses were reported.
// This value is given for reading 30 blocks.
for(İ=0;i<30;i++)
  {
     SD_COKLU_BLOK_OKUMA_VERIOKU();data use operation; // data should be used in each read. Otherwise the newly read data will overwrite the old ones.

  }
SD_COKLU_BLOK_OKUMA_BITIS();//reading has been ended
- Note: After each reading, the template data must either be transferred or used where necessary. Because the new reading will overwrite the old data with the newly read data.
4- Sector Erase Functions
– SD_MOD_SEKTOR_SIL Function
Function : unsigned char SD_MOD_SEKTOR_SIL(unsigned long BASLANGIC_ADRESI,unsigned long BITIS_ADRESI)
purpose :Deletes all intervening sectors, including the specified start and end sectors.
Parameter:
- BASLANGIC_ADRESI :It is the number of the sector to start erasing. It also erases this sector.
- BITIS_ADRESI :It is the sector number to finish the deletion. It also erases this sector.
Usage:
SD_MOD_SEKTOR_SIL(12224,12224);//12224. erases sector
SD_MOD_SEKTOR_SIL(100,1000);//It erases all sectors from 100th sector to 1000th sector.
Feedback :
- If the value returns 1, the operation is successful.
- If the value returns 0, the sector has made a deletion error. (some sectors may be protected and they can not be erased and those sectors may give this error).
- If it returns 255, it means no card.
- User is function.
5-Command Functions
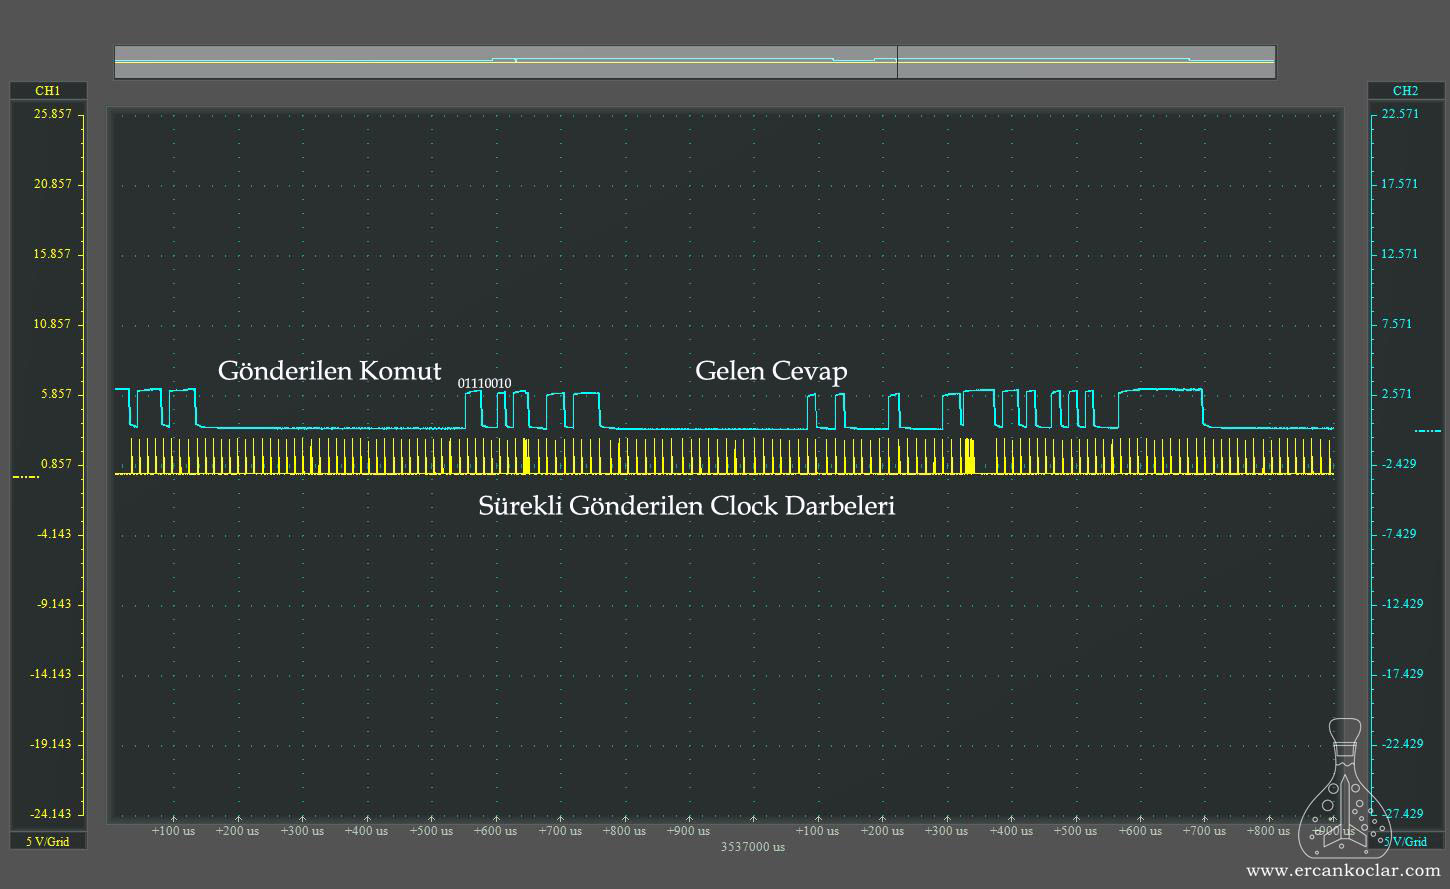
- Under this heading will be explanations of all the commands in my library. However, these commands can not be called and used by the user. Because the SD card’s system mesh is quite complex. After each command, there is a command data etc. that must be left after an answer. However, for those who want to have knowledge in this matter, I explain them. The disclosures will be made superficially.
- Looking at the SD card data sheets, it will be seen that there are many more commands. I just added commands on general usage. But I think I will expand the library in the future.
– CMD0 Command
Function : void CMD0()
Purpose : Reset the SD card to initial position.
– CMD8 Command
Function : unsigned char CMD8()
Purpose :Identifies the SD card and determines what voltage range it will operate on.
– CMD55 Command
Function : unsigned char CMD55(unsigned int RCA_ADRESI)
Purpose :The SD card is sent before the ACMD commands in the system.
– ACMD41 Command
Function : unsigned char ACMD41()
Purpose : determines the information such as the voltage range of SD card, card type, and so on.
– CMD2 command
Function : unsigned char CMD2()
Purpose : Reads CID parameters of SD card
– CMD3 command
Function : unsigned char CMD3()
Purpose :Generates ID for SD card. RCA code.
– CMD9 command
Function : unsigned char CMD9(unsigned int RCA_ADRESI)
Purpose : Retrieves the CSD information of the SD card.
– CMD7 command
Function : unsigned char CMD7(unsigned int RCA_ADRESI)
Purpose : The RCA selects the card to which the address is written, others are idle.
– ACMD6 command
Function : unsigned char ACMD6()
Purpose : Makes the data width 4 bits.
– CMD17 command
Function : unsigned char CMD17(unsigned long ADRES)
Purpose :It makes a single block reading.
– CMD18 command
Function : unsigned char CMD18(unsigned long ADRES)
Purpose :Makes multiple reading.
– ACMD23 command
Function : unsigned char ACMD23(unsigned long BLOK_SAYISI)
Purpose : Makes pre-deleting before multiple writing.
– CMD24 command
Function : unsigned char CMD24(unsigned long ADRES)
Purpose : writes single block
– CMD25 command
Function : unsigned char CMD25(unsigned long ADRES)
Purpose :It writes multiple blocks.
– ACMD22 command
Function : unsigned char ACMD22()
Purpose :Gives the correct number of blocks written.
– CMD32 command
Function : unsigned char CMD32( unsigned long ADRES)
Purpose :Declares the start address of the delete operation.
– CMD33 command
Function : unsigned char CMD33(unsigned long ADRES)
Purpose :Specifies the ending address of the deletion.
– CMD38 command
Function : unsigned char CMD38()
Purpose :Perform deletion.
– CMD12 command
Function : unsigned char CMD12()
Purpose :Stops writing or reading data under all conditions.
– CMD13 command
Function : unsigned char CMD13(unsigned int RCA_ADRESI)
Purpose :Tell the card’s status.
– CMD16 command
Function : unsigned char CMD16()
Purpose : The block length is set to 512 bytes.
– CMD56 command
Function : unsigned char CMD56(unsigned char ISLEV)
Purpose : If the function is 1, it reads. If the function is 0, it writes.
Information Tables About SD Card
- There are sections in the SD card that hold information about themselves. When the SD card software is activated, it automatically reads this information and uses the necessary information. However, all the information remains in the constellations reserved for them. If the user wants to read this information can benefit for their projects.
- There are 2 information tables in the SD card.
- CID : It means “card identity.” The card contains information such as manufacturer, serial number, date of manufacture. In my library, the constant “unsigned int CID [8]” is also stored. It’s 128 bits.
- CSD : Card refers to specific data. The card contains information such as the speed of writing, the voltages it supports, and so on. In my library, the constant “unsigned int CSD [8]” is also stored. It’s 128 bits.
- In order to understand these tables, you need to analyze the data by using the following templates.
1-CID Table ( Card IDentification)
| Name | Width | Area |
| Manufacturer ID | 8 bit | [127:120] |
| OEM/Application ID | 16 bit | [119:104] |
| Name of the product | 40 bit | [103:64] |
| Product Revision | 8 bit | [63:56] |
| Product Serial Number | 32 bit | [55:24] |
| Reserved Area | 4 bit | [23:20] |
| Production date | 12 bit | [19:8] |
| CRC7 Code | 7 bit | [7:1] |
| It is always 1 out of use. | 1 bit | [0:0] |
- Let’s simply look at how we should handle the data in the table.
- Manufacturer ID: The number that identifies the card manufacturer. Binary codes must be read as decimal equivalents. The SD card set has assigned a number to each manufacturer. This number is its counterpart.
- OEM / Application ID: Indicates whether the system is based on Flash or Rom. 2 ASCII characters (ie, characters of each font in the 8-bit memory space) should be read as.
- Product Name: Gives the product name. It must be read like 5 ASCII characters.
- Product Revision: Specifies the revision made after product production. Binary codes should be separated into 4 bits. Eg: 0110 0010 binary code is equal to 98 when it is put together. But this is wrong. The truth is to divide into 2. That is, 0110 = 6, 0010 = 2 then the card has 6.2.
- Product Serial Number: Returns the product serial number.
- Reserved Area: The area that the SD card group allocates for future expansion and modification. The information read in this area has no value or meaning.
- Date of Manufacture: Gives the date when the card was produced.
- Let’s assume that the read data is 000000010100 binary.
[11: 8] gives us the month. So the decimal value here is the number of the month. Ex:000000010100 = 4 means April. - [19:12] gives us the year. So the decimal value here is the number of the year. Ex: 00000001
0100= 1 means 2001 year. Since SD cards are manufactured at the earliest in 2000, the date can be read as 2000 at most. If so, the data would be “000000000100“.
- Let’s assume that the read data is 000000010100 binary.
- CRC7 code :When the command is sent, it is the CRC code that the SD card sends with the reply for control purposes. There is no prominence and value for the user.
- Disable: Always 1 dir. It has no importance.
2-CSD Table (Card-Specific Data)
| Name | Original Zone Names | Width | Area |
| CSD stucture | CSD_STRUCTURE | 2 bit | [127:126] |
| Reserved Area | – | 6 bit | [125:120] |
| Data Reading Rate -1 | TAAC | 8 bit | [119:112] |
| Data Read Speed – 2 CLK cycles | NSAC | 8 bit | [111:104] |
| Max. Data Transfer Rate | TRAN_SPEED | 8 bit | [103:96] |
| Card Command Class | CCC | 12 bit | [95:84] |
| Max. Data Reading Block Width | READ_BL_LEN | 4 bit | [83:80] |
| Part Block Reading Active | READ_BL_PARTIAL | 1 bit | [79:79] |
| Non-aligned Block Writing | WRITE_BLK_MISIALIGN | 1 bit | [78:78] |
| Non-aligned Block Reading | READ_BLK_MISIALIGN | 1 bit | [77:77] |
| DSR Embedded | DSR_IMP | 1 bit | [76:76] |
| Reserved Area | – | 2 bit | [75:74] |
| Device Size | C_SIZE | 12 bit | [73:62] |
| Max. Reading Current @VDD min |
VDD_R_CURR_MIN | 3 bit | [61:59] |
| Max. reading current@VDD max | VDD_R_CURR_MAX | 3 bit | [58:56] |
| Max. writing current @VDD min | VDD_W_CURR_MIN | 3 bit | [55:53] |
| Max. writing current @VDD max | VDD_W_CURR_MAX | 3 bit | [52:50] |
| Device Size Factor | C_SIZE_MULT | 3 bit | [49:47] |
| Single Block Erase Enabled | ERASE_BLK_EN | 1 bit | [46:46] |
| Erasable Sector Size | SECTOR_SIZE | 7 bit | [45:39] |
| Write Protected Group Size | WP_GRP_SIZE | 7 bit | [38:32] |
| Writing Protected Group Enabled | WP_GRP_ENABLE | 1 bit | [31:31] |
| Reserved area | – | 2 bit | [30:29] |
| Writing Speed Factor | R2W_FACTOR | 3 bit | [28:26] |
| Max. Writeable Data Block Length | WRITE_BL_LEN | 4 bit | [25:22] |
| Part Block Writing Active | WRITE_BL_PARTIAL | 1 bit | [21:21] |
| Reserved Area | – | 5 bit | [20:16] |
| File Format Group | FILE_FORMAT_GRP | 1 bit | [15:15] |
| Copy Flag | COPY | 1 bit | [14:14] |
| Permanent Writing Protection | PERM_WRITE_PROTECT | 1 bit | [13:13] |
| Temporary Writing Protection | TMP_WRITER_PROTECT | 1 bit | [12:12] |
| File Format | FILE_FORMAT | 2 bit | [11:10] |
| Reserved area | – | 2 bit | [9:8] |
| CRC | CRC | 7 bit | [7:1] |
| Not used – always 1 | – | 1 bit | [0:0] |
- The CSD table is quite a long table as you can see. There are many parameters that I do not use or generally never use. Because there is a possibility to get the information in the system faster than elsewhere but we still use it for detailed information about the card. While I am telling you what I know and have solved, I will try to write by figuring out from datasheet what I do not use and do not know.
- Particularly important for FAT32 in this table was the part about SD card size. Of course you can benefit from different data in different projects.
- Let’s start by briefly describing the table.
- CSD Stucture (CSD_STRUCTURE): Specifies which version the CSD belongs to.
- Data Read Rate -1 (TAAC): Shows card reading speed. The table below shows how the bits reserved for this region should be read and what it means.
Position Code [2:0] Time Unit
0=1ns, 1=10ns, 2=100ns, 3=1µs, 4=10µs, 5=100µs, 6=1ms, 7=10ms[6:3] Time Value
0=reserved, 1=1.0, 2=1.2, 3=1.3, 4=1.5, 5=2.0, 6=2.5, 7=3.0, 8=3.5, 9=4.0, A=4.5, B=5.0, C=5.5, D=6.0, E=7.0, F=8.07 Reserved area - Data Read Rate – 2 CLK Cycles (NSAC): Specifies the lowest rate that can be deducted for data access (per 100 cycles).
- Max. Data Transfer Rate (TRAN_SPEED): The following table shows the max. Data rate per data line (ie single data port). data transfer rate.
Position Code [2:0] Transfer Rate Unit
0=100kbit/s, 1=1Mbit/s, 2=10Mbit/s, 3=100Mbit/s, 4… 7=reserved[6:3] Time Value
0=reserved, 1=1.0, 2=1.2, 3=1.3, 4=1.5, 5=2.0, 6=2.5, 7=3.0, 8=3.5, 9=4.0, A=4.5, B=5.0, C=5.5, D=6.0, E=7.0, F=8.07 Reserved area - Card Command Class (CCC): Specifies the command class that the card has. The following table describes how to interpret the reading.
CCC Bit Command class 0 class 0 1 class 1 ….. 11 class 11 - Max. Data Read Block Width (READ_BL_LEN): Informs the SD card how many blocks it can read in one go. As standard on SD cards it always allows reading and writing of 512 byte blocks. The following table lists the values that can be read for different results (This parameter is 4 bits as you can see in the table. This value is the decimal equivalent of the 4 bit binary code given in the table.You should evaluate the data that you receive in this way.)
value Block width 0-8 Reserved area 9 29= 512 byte 10 210=1024 byte 11 211=2048 byte 12-15 Reserved area - Part Block Read Active (READ_BL_PARTIAL): Reading of small blocks from the block is always read as 1 because it is active.
- Non-aligned Block Writing (WRITE_BLK_MISIALIGN): If this region;
- If 1 is read, it will allow you to write misaligned.
- If 0 is read, it will not let you write misaligned.
- If we will briefly describe alignment writing; we mentioned the block size above. 512 bytes. If this block is not aligned from the beginning, it will eventually overflow and some will overflow to the other block. Some SD cards will not allow this, and if they see this, it will fail to write. Whether this is allowed or not is understood here.
- Non-aligned Block Reading (READ_BLK_MISIALIGN): If this area is;
- read as 1 it allows misreading
- If 0 is read it does not allow reading without alignment.
- DSR Embedded (DSR_IMP): One of the SD card’s tables is the DSR table. It contains security-related information, but this table may not be on every SD card. Here it is checked whether this table is found or not.
DSR area DSR status 0 No DSR table 1 DSR Table is Available - Device Size (C_SIZE): Used to calculate card capacity. The total capacity account is as follows.
- Memory Capacity = BLOCKNR*BLOCK_LEN
- BLOCKNR = (C_SIZE+1)*MULT
- MULT = 2C_SIZE_MULT+2
- BLOCK_LEN = 2READ_BL_EN
- Reading Current @VDD min / Writing Current @VDD min (VDD_R_CURR_MIN, VDD_W_CURR_MIN): Returns the current value to be drawn when writing and reading at the lowest voltage.
reading current @VDD min
writing current @VDD minCode [2:0] 0=0.5mA; 1=1mA; 2=5mA; 3=10mA; 4=25mA; 5=35mA; 6=60mA; 7=100mA - Reading Current @VDD max / Writing Current @VDD max (VDD_R_CURR_MAX, VDD_W_CURR_MAX): Returns the current value to be drawn when reading and writing at the highest voltage.
reading current @VDD max
writing current @VDD maxCode [2:0] 0=1mA; 1=5mA; 2=10mA; 3=25mA; 4=35mA; 5=45mA; 6=80mA; 7=200mA - Device Size Multiplier (C_SIZE_MULT): gives the total memory of the SD card used in the calculation process.
C_SIZE_MULT MULT 0 22=4 1 23=8 2 24=16 3 25=32 4 26=64 5 27=128 6 28=256 7 29=512 - Single Block Erase Enabled (ERASE_BLK_EN): Controls whether the erase operation can be performed in 512 bytes or smaller pieces.
- If it is 1, it makes fragmented deletion.
- If it is 0, deletes all.
- Deleteable Sector Size (SECTOR_SIZE): Gives the size of the sector that can be deleted.
- If 0, 1 block is cleared.
- 127 means 128 blocks can be deleted.
- Write Protected Group Size (WP_GRP_SIZE): Returns the protected sector size. As above, the actual size is a bit more than the value read.
- Write Protected Group Enabled (WP_GRP_ENABLE): 0 means that group protection is not possible.
- Writing Speed Factor (R2W_FACTOR): Provides detection of the multi-block reading speed. That is, the values given in the previous sections are divided by the value in the table to obtain the multiple reading speed.
R2W_FACTOR MULTI-READING ACCESS TIME 0 1 1 2 (half the speed you read) 2 4 3 8 4 16 5 32 6,7 Reserved area - Max. Writeable Data Block Length (WRITE_BL_LEN): The max. block size. Always readable block size and readable block size is equal on SD cards.
WRITE_BL_LEN BLOCK SIZE [0:8] Reserved area [9] 29=512 byte [10] 210=1024 byte [11] 211=2048 byte [12:15] Reserved area - Part Block Writing Active (WRITE_BL_PARTIAL): Controls whether or not all or 512 bytes are written.
- If 0, 512 byte blocks can be written.
- If 1, it can be written in smaller pieces than 512 bytes.
- File Format Group (FILE_FORMAT_GRP): Specifies the selected file formats. Used in conjunction with (FILE_FORMAT).
- Copy Flag (COPY): Indicates whether the card content is a copy.
- 0 is original.
- 1 is a copy.
- Permanent Writing Protection (PERM_WRITE_PROTECT): Checks card for write protection
- 0 is the default value. there is no protection
- 1 All write-erase operations are permanently disabled.
- Temporary Writing Protection (TMP_WRITER_PROTECT): Controls whether the card is writing protected.
- 0 is the default value. So there is no protection.
- 1 All write-erase operations are temporarily disabled.
- File Form (FILE_FORMAT): Specifies the format of the file on the card.
FILE_FORMAT_GRP FILE_FORMAT FILE TYPE 0 0 Section Table and HDD Similar 0 1 DOS FAT 0 2 Universal File Format 0 3 Other / Unknown 1 0,1,2,3 Reserved Area - We also came to the end of the CSD chart. It can get very complicated at first, but you will understand it over time. These tables are already for information purposes. It does not have to be used absolutely. Only when the user is going to do different projects may need this information.
Application of Functions
- Let’s test how the user functions are used in more detail.
- We need to be able to see the sectors of the SD card as the transactions we are doing are at sector level. I use the free “WinHex” program for this.
1-Making Pin Identification
- We are making the SD card drive cycle identifiable to whichever port the PIC is connected to. Thus, software and hardware compatibility is ensured. The sample definition is as follows.
//sd card
sbit SD_DATA0 at RB0_bit;
sbit SD_DATA1 at RB1_bit;
sbit SD_DATA2 at RB2_bit;
sbit SD_DATA3 at RB3_bit;
sbit SD_CLK at RB5_bit;
sbit SD_CMD at RB4_bit;


sbit SD_DATA0_Direction at TRISB0_bit;
sbit SD_DATA1_Direction at TRISB1_bit;
sbit SD_DATA2_Direction at TRISB2_bit;
sbit SD_DATA3_Direction at TRISB3_bit;
sbit SD_CLK_Direction at TRISB5_bit;
sbit SD_CMD_Direction at TRISB4_bit;
2- SD Card Identification and Preparation for Using
- The function “SD_SDMOD_ANALIZ” must always be called first. This function is the basic main function. Detects, edits, and makes the SD card ready for use.
void  main()
{
    ADCON1=7;//It is the port setting related to PIC. There is nothing to do with the SD card.
    CMCON=7;// It allows the comparators related to PIC to be turned off.

    SAP1024_INIT(240,128,6);//The GLCD library to be used in the project is the invocation code.

    SD_SDMOD_ANALIZ(4);// It analyzes the SD card and prepares it for use. It is reported here that 4 data ports can be used by writing 4.

}
3- Writing Data to SD Card Sectors
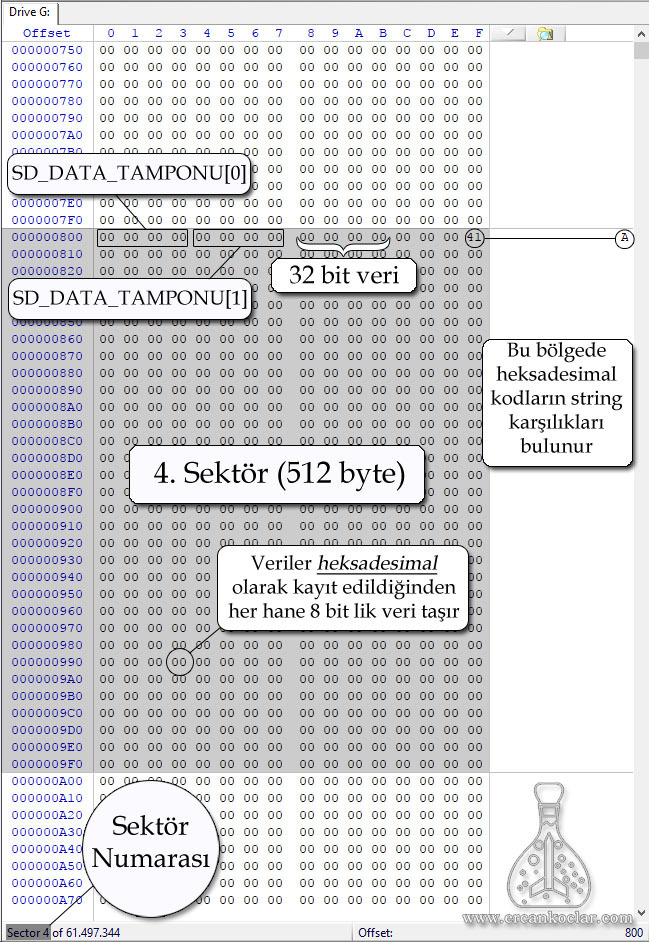
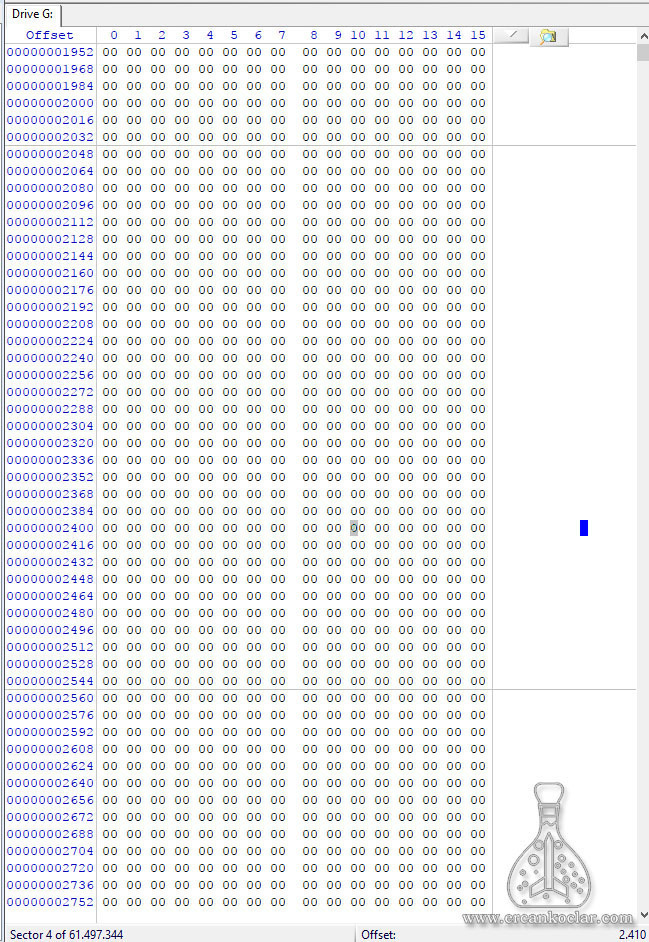
- First of all, before entering the sector writing process; Let’s look at how to read the sector and how to read it briefly from the picture above.
- In the picture above, there is 1 sector that is open black. The size is 512 bytes. (1 sector is always 512 bytes in SD cards)
- Below is what sector we are in and what is the total number of sectors. If we compare the total sector with 512 bytes, we will find the total capacity of the SD card.
- As previously described, the data is first loaded into the SD_DATA_TAMPONU array. When this sequence is written on the SD card, each element of the array is written and read in sequence, as shown in the picture above. We have to take this into account when data is loaded or loaded from the SD card sector.
- The SD_DATA_TAMPONU array is of type Long because 4 data cells are selected for each array element. It’s 32 bits. Each data eye “00” has 8 bits, so a series of elements fill 4 data eyes. “00 00 00 00“.
- Sectors are always shown as hexadecimal when they are shown. For this reason, we must evaluate each and every data we see as hexadecimal.
- The blank white area shown on the right is the string equivalents of the data in the sector. For example, hexadecimal 41 (0x41) appears at the end of line 1. This corresponds to the letter “A”. (If we wanted to read this region, we would read the array element SD_DATA_TAMPONU [3], and GLCD would read 65 values with decimal offset 0x41).
- After having a brief knowledge about the sectors, I will try to print sector 4 “www.ercankoclar.com” again with the sector writing command.
void  main()
{
   unsigned char denetim=120;

   ADCON1=7;
   CMCON=7;

   SAP1024_INIT(240,128,6);//glcd  screen identification code

   do{denetim=SD_SDMOD_ANALIZ(4);}while(denetim==0); //  sd card analysis

   //Data is loaded into the buffer.
   SD_DATA_TAMPONU[0]=0x7777772E;//www.
   SD_DATA_TAMPONU[1]=0x65726361;//erca
   SD_DATA_TAMPONU[2]=0x6E6B6F63;//nkoc
   SD_DATA_TAMPONU[3]=0x6C61722E;//lar.
   SD_DATA_TAMPONU[4]=0x636F6D20;//com

   do{denetim=SD_MOD_TEK_BLOK_YAZ(4);}while(denetim==0); // Data are written to 4th sector.

   SAP1024_YAZI_YAZMA(1,1,"bitti");//The GLCD is printed out on the screen.

}
- Let us examine the above software before it goes into the results.
- The variable named “Denetim” was defined and given a random value. A control mechanism is created for the function “SD_SDMOD_ANALIZ (4)” as you will see below for this variable. Accordingly, this function will be repeated as long as it is not successful. Likewise, the function “SD_MOD_TEK_BLOK_YAZ (4)” was included in the control mechanism. Run SD card functions by putting them in a control mechanism. Because SD cards have a system in themselves. It does not always answer correctly the first time, or it may be necessary to run the functions more than once if synchronization is not available. The “Denetim” variant was used to understand if these functions were true or not.
- In the SD_DATA_TAMPONU sequence, I also wrote hexadecimal equivalents (you can write either decimal or binary) of the characters you want to print. The reason I wrote each line as 4 characters would be 32 bits in series long type. Since each character is 8 bits, 1 sequence can carry a maximum of 4 characters. For this reason, there are 4 characters per line (the space is a character and hexadecimal precision is 0x20)
- SAP1024_YAZI_YAZMA (1,1, “bitti”) This function allows me to check a function of my “GLCD Library” ie GLCD. I can see that the process is over by adding it here. Instead, you can also set a led to turn on the LED when the process is finished.
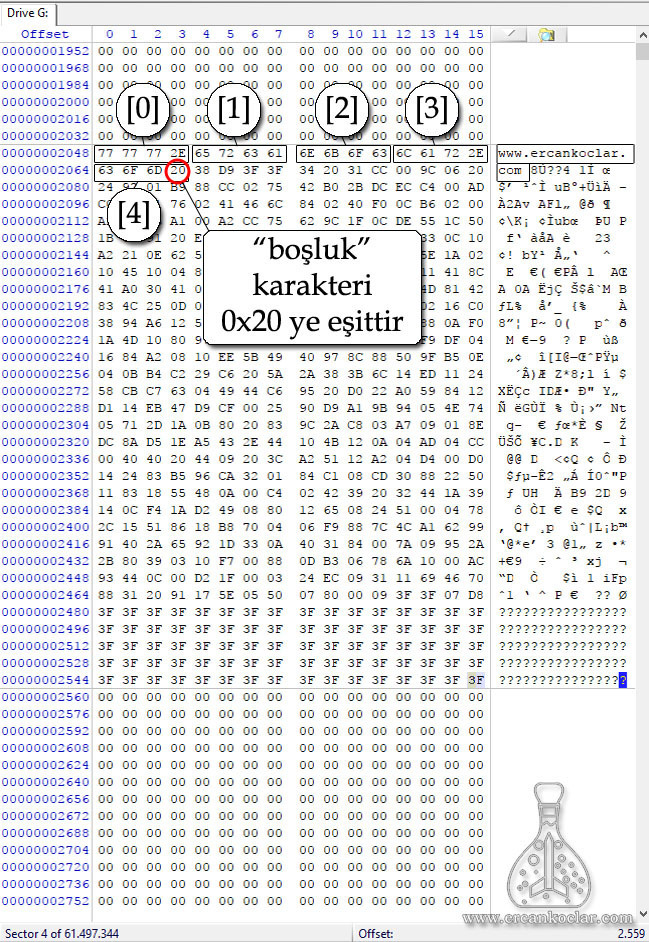
- As you can see in the picture above, our statements are written correctly. You can also see where in the industry the SD_DATA_TAMPONU sequence is written by checking the picture.
- You have also caught your attention. After “www.ercankoclar.com“, there is a lot of data inexplicably. However, we did not make such a definition. The reason for this is shudder; When the PIC is turned on (this is the same for all systems, PC etc.) it gives a random value to all ram eyes. If you do not equate the remaining elements of the array to zero, then those arrays work with randomly given values at first.
- Let’s add it to our code and get a clean image.
void  main()
{
   unsigned char denetim=120,i;

   ADCON1=7;
   CMCON=7;

   SAP1024_INIT(240,128,6);//glcd screen identification code

   do{denetim=SD_SDMOD_ANALIZ(4);}while(denetim==0); //  sd card analysis

   //Data is loaded into the buffer.
   SD_DATA_TAMPONU[0]=0x7777772E;//www.
   SD_DATA_TAMPONU[1]=0x65726361;//erca
   SD_DATA_TAMPONU[2]=0x6E6B6F63;//nkoc
   SD_DATA_TAMPONU[3]=0x6C61722E;//lar.
   SD_DATA_TAMPONU[4]=0x636F6D20;//com

   //Unused buffers are equal to zero.
   for(i=5;i<128;i++)
     {
       SD_DATA_TAMPONU[i]=0;
     }

   do{denetim=SD_MOD_TEK_BLOK_YAZ(4);}while(denetim==0); // Data are written to 4th sector.

   SAP1024_YAZI_YAZMA(1,1,"bitti");//GLCD finished is printed on the screen

}
- We’ve added a for loop to the software. If you notice, I made i = 5. Because the series between 0-4 is my statement. The rest should be cleaned. In total there are 128 arrays for up to 128 (5-127) cleaned.
- Maybe you can think why I did not clean all the sequence at first. Because clearing the areas to be used will cost us extra time. I’ve also earned it by clearing away areas that are no longer in use.
- The result can be seen below.
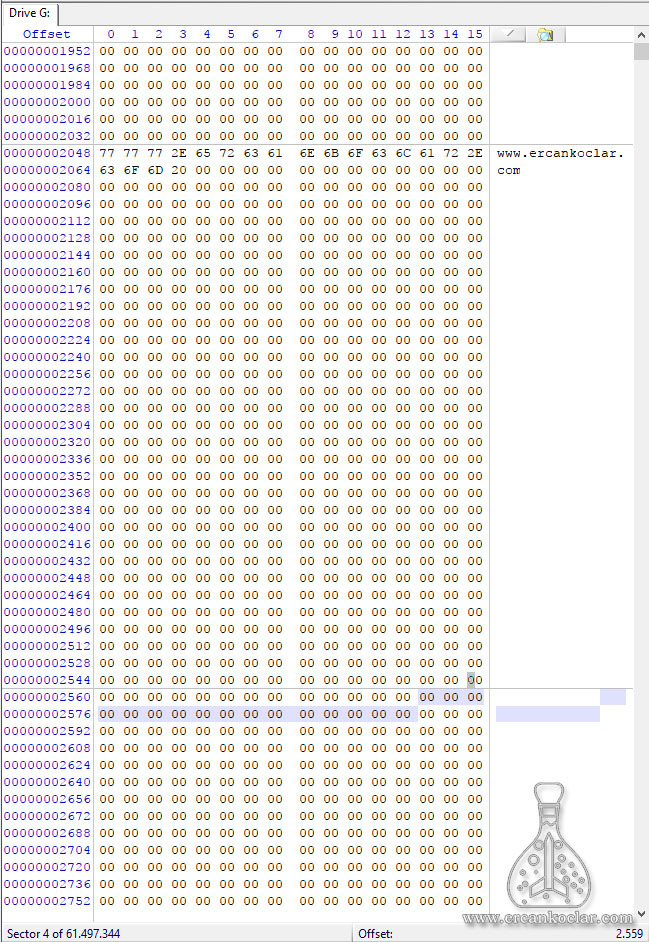
4- Reading Data from SD Card Sectors
- The data we wrote in sector 4 on the SD card will be read with the function SD_MOD_TEK_BLOK_OKUMA and we will see the result in the GLCD.
- I use SAP1024B as GLCD and I check this screen with my own library. You can either do this or see the data read with different screens.
- If reading will be done, you should definitely have IP4252CZ8 Passive Filter mentioned earlier in your system. Otherwise, the read data will be incorrect. However, in my experiments, if you choose 1 bit mode instead of 4 bits at first, I see that reading is successful without passive filter. But there is no guarantee of this.
- Now let’s read the data that exists in sector 4 of our SD card.
void  main()
{
  unsigned char denetim=120,i=0;
  unsigned char donusum[9];//created for the standard transforming library of mikroC.
    ADCON1=7;
    CMCON=7;

   SAP1024_INIT(240,128,6);

   do{denetim=SD_SDMOD_ANALIZ(4);}while(denetim==0);//SD card analysis and setup was done.
   do{denetim=SD_MOD_TEK_BLOK_OKUMA(4);}while(denetim==0);// The fourth sector was read and written to the data buffer.

   for(i=0;i<5;i++)// the sequence will be printed in line by line with GLCD.
     {
       LongWordToHex(SD_DATA_TAMPONU[i],donusum); //   The data in the data buffer was converted to hexadecimal.
       SAP1024_YAZI_YAZMA(1,(i+1),donusum);// Evolved data was written in GLCD.
     }
}
- First of actual numeric values or in general in glcd screen is not visible. For this reason, we must convert these values to string types. I did the conversion with the LongWordToHex function so that the data read using the microc’s standard conversion library for the conversion would look hexadecimal. To use this function we need to define a char array of 9 elements.
- After analyzing the SD card, I read the 4th sector and the data was written in SD_DATA_TAMPONU.
- I printed 5 lines of SD_DATA_TAMPONU (0-4) with a for loop and printed it in line by line in GLCD.
- Let’s see the results from the photo below.
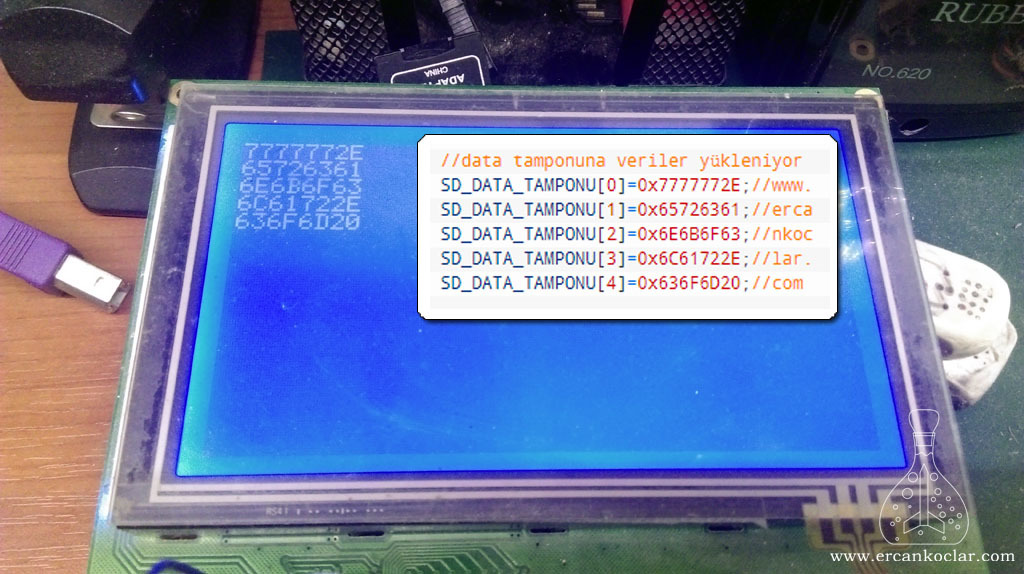
- In the above photo, the data read from sector 4 of the SD card and the data written in the previous section can be seen.
- When the comparison is made, it is seen that the two are the same, that is, the reading is done correctly.
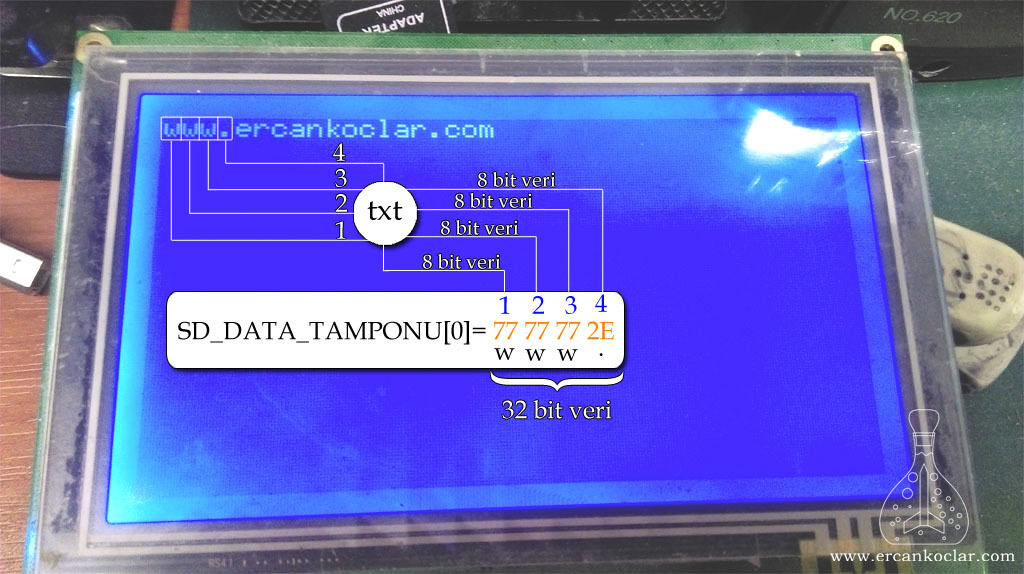
- Let’s illustrate by example how we will display “www.ercankoclar.com” data which we wrote in the sector of SD card as direct writing.
void  main()
{
    unsigned char denetim=120,i=0,j=0,k=1;
    unsigned char txt[2];// created to represent the read data as characters.
    ADCON1=7;
    CMCON=7;

   SAP1024_INIT(240,128,6);

   do{denetim=SD_SDMOD_ANALIZ(4);}while(denetim==0);//SD card analysis and setup was done.
   do{denetim=SD_MOD_TEK_BLOK_OKUMA(4);}while(denetim==0);// The 4th sector was read and written to the data buffer.

   txt[1]=0;// The last element in a string must be 0. Otherwise it will give an error.
            //because it continues to read string strings until the system sees 0.

   // The 32 bit data at our disposal will be divided into 4 parts. Each piece will be printed on the individual GLCD.
   // a column will be shifted each time to prevent the text from coming up.
   for(j=0;j<5;j++)
     {
       for(i=0;i<4;i++)
         {
           txt[0]=SD_DATA_TAMPONU[j]>>(24-(i*8));// Because the data buffer is 32 bits, I transferred the data by shifting.
           SAP1024_YAZI_YAZMA(k,1,txt);//one column was shifted each time so that the characters do not overlap.
           k++;//column shifting variable
         }
     }
}
- The rationale of the program is as described above. Separate 32 bits of data into 4 parts and give it as 8 bits. But why do not we print directly from 32 bits. That’s why it’s stored in the data type. SD_DATA_TAMPONU is of type long, but the data type must be char (charcter) type in order to do the above operation. Since the char type is 8 bits, the data is first assigned to the variable type char divided into 8 bits.
- txt [1] = 0 In the intended string of strings, the system does not understand that the system has arrived at the end of the array until it reads zero, starting with the first element. For this reason, we put a zero here to indicate that the system has arrived at the end of the directory.
- Each time the SD_DATA_TAMPONU element is divided into 4 pieces, the next sequence is passed. For this reason, I used the for loop.
- This is the logic of the SD card as the print character in the sector. The result is seen in the following photograph.
- Transfer logic is explained in the photo. All data is shredded and shipped to the GLCD with the appropriate data type. Each column is shifted by 1 column. Thus, the characters do not overtake and the desired result is obtained.
5- Deletion of Data in the Sector of SD Card
- The SD_MOD_SEKTOR_SIL function will delete the data that we wrote to sector 4 of the SD card.
- Because deletion is sector size, it is a permanent deletion and can never be restored.
- Let’s examine the code we will use for sector deletion.
void  main()
{
  unsigned char denetim=120;
    ADCON1=7;
    CMCON=7;

   SAP1024_INIT(240,128,6);

   do{denetim=SD_SDMOD_ANALIZ(4);}while(denetim==0);//SD card analysis and setup was done.
   do{denetim=SD_MOD_SEKTOR_SIL(4,4);}while(denetim==0);// 4th sector was deleted.
   SAP1024_YAZI_YAZMA(1,1,"bitti");//GLCD Printed over the screen
}
- The deletion was performed with the function SD_MOD_SEKTOR_SIL. This function requires the industry start and end addresses to be deleted. If the single sector is to be deleted, the same sector number is written in the start and end addresses.
- The result can be seen in the picture below.
SD Card Result
- You have also learned to make sector-wide transactions on SD cards by establishing the necessary drive cycle for the use of SD cards.
- Even if sector size data is written, we can not see and read this data when we enter the SD card. We can not create files in any way.
- If you do not just want to write data to sectors but want to go to “File System”, continue with FAT32 lesson below.
- That’s the logic of the SD card. Now we can switch to FAT32 in the second part of our lesson.
FAT32 File System
- Before switching to the FAT32 file system, you should first see the system on which the disks are based.
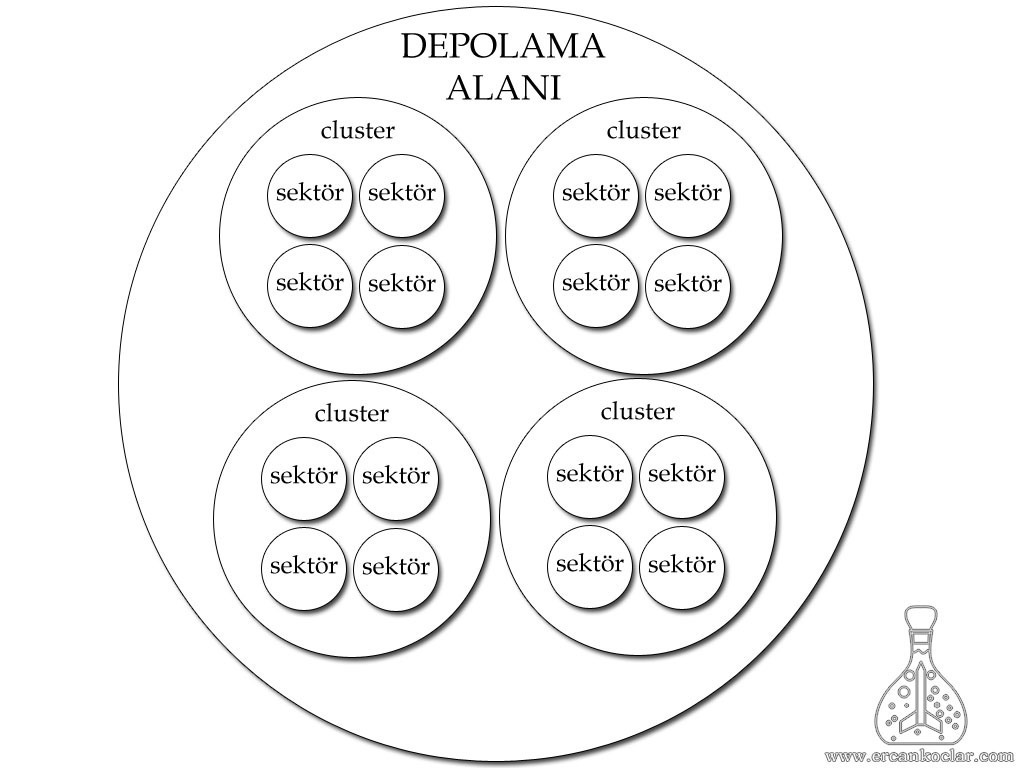
- As you can see in the picture above, all the discs have a similar system.
- Accordingly, a disc’s (storage medium) smallest building block are “sectors“.
- Sectors unite to form “clusters“.
- Clusters come together to form the disk.
- It is a completely nested system.
- In SD cards, 1 sector is always 512 bytes. However, the cluster size depends on the selection we made when formatting that card.
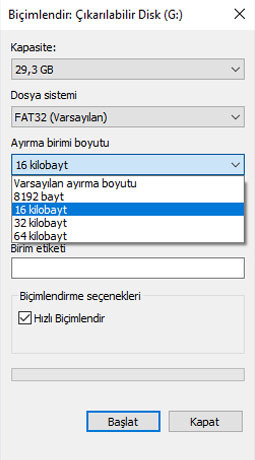
- As we have seen above, we choose the cluster size when formatting.
- The cluster size determines how disc will be broken down. No matter how large the cluster size is in the FAT32 file system, even if it is the simplest text file, 1 cluster is assigned to it immediately. In other words, even the file size is 1 byte, at least 8192 byte space is allocated. Accordingly, choosing the smallest clusters makes the disk space more efficient while slowing the readings in large files.
- Note that in the study, the cluster number is a whole structure covering the sectors. Sectors bring clusters to the scene.
- Now you can simply see the FAT32 file system.
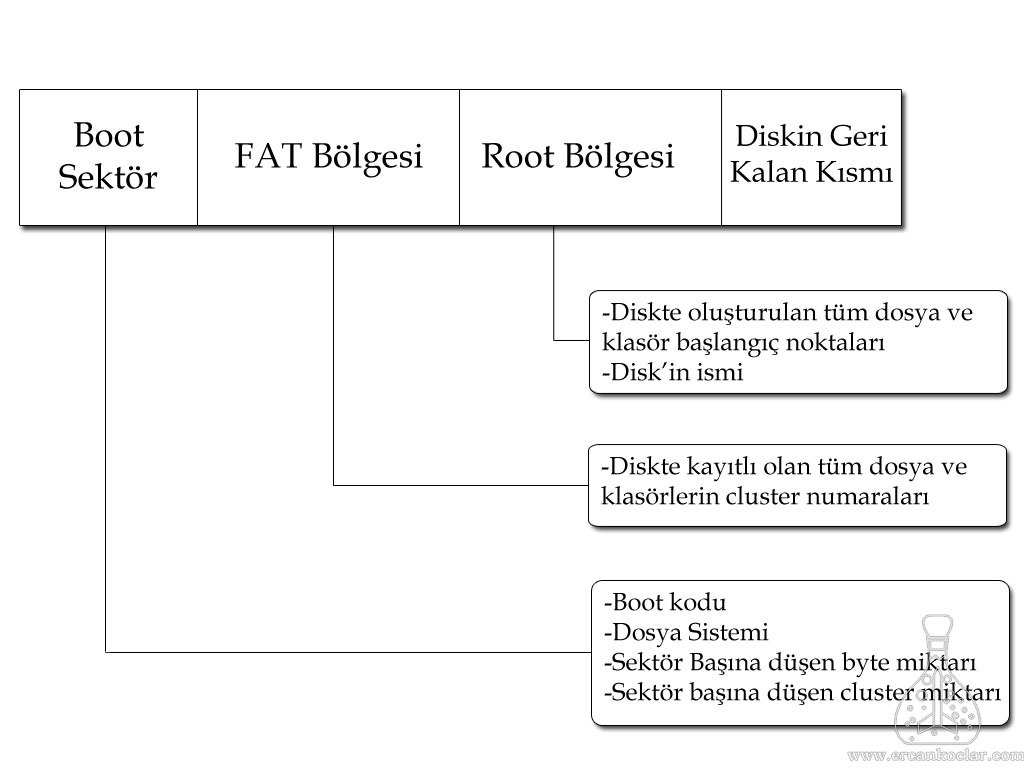
- The FAT32 system basically consists of three parts;
- Boot Sector: This section is read first when a disk is inserted. Here the system checks if it has any filesystem. Here is about the disc;
- The amount of bytes per sector
- The amount of sector per cluster
- Reserve sector size
- How many FAT zones
- Learns the total number of sectors. However,There are many other parameters that are not suitable for most SD cards. All information in this area is called FAT32 because it has 32 bytes in total.
- FAT Zone: Generally, there are two FAT1 and FAT2 backups. When a file is created on the disk, a cluster from that area is immediately allocated to that file. If this file comes to a size exceeding 1 cluster, a new cluster is automatically given. Each cluster number is stored in the table as 32 bits and it gives the number of the next cluster. Thus, the system correctly reads and reads the continuation of large files. When the last cluster is reached, the End Of File marks the end of the file.
- Root Zone: In this area, we first give the name we gave when the disc was formatted. Each name or other information (such as a cluster number) of each file or folder created on the disk is included here. In the FAT32 system, the entire root zone is scanned one by one and then the new file is created. After a while the increase in the number of files causes an excessive slowdown. For this reason, creating files by grouping them in folders in FAT32 system will increase the speed of the system.
- Boot Sector: This section is read first when a disk is inserted. Here the system checks if it has any filesystem. Here is about the disc;
- FAT32 supports discs up to 2TB.
FAT32 File System Software
- First of all, we recommend you to use the PIC18F4620 in terms of space. Because FAT32 operations take up a lot of space.
Since the FAT32 software is fully compatible with the SD card, there is no need to install or configure anything extra. - There is not only long file name support for FAT32 in the software. That’s why it does not waste the capacity of the PIC unnecessarily. However, it can be added in the future.
- There are some constants that I use in the software. These constants were created for use in certain operations. You can learn the names from here because MicroC will not allow you to define variables with the same name.
- unsigned long SD_FAT32_SECTOR: Used in file selection function
- unsigned long SD_FAT32_CLUSTER: used in select function
- unsigned long SD_FAT32_DOSYA_KONUM_SECTOR: Used in file positioning function
- unsigned int SD_FAT_32_KOK_DIZIN: Root region. At the same time keeps the knowledge of this region.
- unsigned char SD_FAT32_DIZI: Used in file select function.
- unsigned char SD_FAT32_DOSYA_ICERIK_DIZI: Used for file content operations.
- unsigned char SD_FAT32_SON_KALINAN_BIT_SAYISI: Used for file content operations.
Functions
- In this section I will take the functions one by one.
- The headers of user functions will be written in green, and the titles of system functions in red.
1- Initial Analysis and Format Functions
– SD_FAT32_INIT Function
Function : unsigned char SD_FAT32_INIT()
Purpose :It reads the SD card and checks whether formatting is required.
Parameter : no
Usage :
SD_FAT32_INIT();//Reads the SD card to determine whether the card should be formatted and discarded.
Feedback :
- If it is 0, the card should be formatted.
- If it is 1, no formatting is required.
- User function.
– SD_FAT32_FORMAT Function
Function : unsigned char SD_FAT32_FORMAT(unsigned char DISK_ETIKETI[11])
Purpose :
- It formats the SD card to fit the FAT32 system.
- All data on the diskette is deleted. Deep format. No return
Parameter :
- DISK_ETIKETI[11]
- The name to be given to the SD card is determined.
- Supports Turkish characters.
- 11 characters name can be given.
Usage :
SD_FAT32_FORMAT("eşröç ");// Formatted and named. Supports Turkish characters.
Feedback :
- If it is 1, it is successful.
- User function.
2- Calculation Functions
- It’s all system function. It was given for information purposes only.
- Calling these functions may cause system malfunction.
2A- General Account Functions
– SD_FAT32_TOPLAM_SEKTOR_SAYISI Function
Function : unsigned long SD_FAT32_TOPLAM_SEKTOR_SAYISI()
Purpose :It calculates the total number of sectors in the SD card.
Parametrer : no
Usage :
SD_FAT32_TOPLAM_SEKTOR_SAYISI();//It calculates the number of sectors in the SD card.
Feedback :
- There are no error reports.
- It returns the number of the sector.
- System function.
– SD_FAT32_KOKDIZIN Function
Function : void SD_FAT32_KOKDIZIN()
Purpose :Calculates the root directory of the SD card.
Parameter : no
Usage :
SD_FAT32_KOKDIZIN();//Calculates the data start sector of the SD card. This is also the root directory number.
Feedback :
- No feedback is given.
- System function
– SD_FAT32_BPB_FATSz32 Function
Function : unsigned int SD_FAT32_BPB_FATSz32()
Purpose :Calculates the number of sectors per FAT zone.
Parameter : no
Usage :
SD_FAT32_BPB_FATSz32();//Number of sectors per FAT
Feedback :
- No error reporting.
- Returns sector number.
- System function
– BPB_RsvdSecCnt Function
Function : unsigned int BPB_RsvdSecCnt()
Purpose :Calculate reserve sectors.
Parameter : no
Usage :
BPB_RsvdSecCnt();
Feedback :
- It does not generate an error report.
- Returns the number of reserved sectors.
- System function.
– SD_FAT32_BOS_CLUSTER_SAYISI Function
Function : unsigned int SD_FAT32_BOS_CLUSTER_SAYISI()
Purpose :Calculates the number of free clusters.
Parameter : no
Usage :
SD_FAT32_BOS_CLUSTER_SAYISI();//FSI_Free_Count- Calculates the number of free clusters.
Feedback :
- It does not generate an error report.
- Returns the number of free clusters.
- System function.
– SD_FAT32_SD_ID Function
Function : unsigned long SD_FAT32_SD_ID()
Purpose: It reads the ID number of the SD card.
Parameter : no
Usage :
SD_FAT32_SD_ID();//BS_VOLID - SERIAL NUMBER READING
Feedback :
- It does not generate an error report.
- Returns the serial number.
- System function.
2B- FAT Zone Account Functions
– FAT_BOLGE_DUZENLEME Function
Function : unsigned int FAT_BOLGE_DUZENLEME(unsigned int BASLANGIC_CLUSTER_NUMARASI)
Purpose :It detects empty and full locations in the FAT zone. Makes the necessary arrangement.
Parameter :
- BASLANGIC_CLUSTER_NUMARASI :Enter the cluster number to start the scan.
Usage :
FAT_BOLGE_DUZENLEME(100);
Feedback :
- It does not generate an error report.
- System Function.
– FAT_BOLGE_OKUYUCU Function
Function : unsigned int FAT_BOLGE_OKUYUCU(unsigned int BASLANGIC_CLUSTER_NUMARASI)
Purpose :From the given cluster number, it reads all the clusters and returns their numbers.
Parameter :
- BASLANGIC_CLUSTER_NUMARASI :Enter the cluster number to start the scan.
Usage :
FAT_BOLGE_OKUYUCU(100);
Feedback :
- It does not generate an error report.
- System Function.
– FAT_BOLGE_SILICI Function
Function: unsigned char FAT_BOLGE_SILICI(unsigned int BASLANGIC_CLUSTER_NUMARASI)
Purpose :Deletes all clusters in order by following the tail from the given start cluster.
Parameter:
- BASLANGIC_CLUSTER_NUMARASI :Enter the cluster number to start the scan.
Usage :
FAT_BOLGE_SILICI(100);
Feedback :
- It does not generate an error report.
- System Function.
– FAT_SON_BOLGE_BULUCU Function
Function : unsigned long FAT_SON_BOLGE_BULUCU(unsigned int BASLANGIC_CLUSTER_NUMARASI)
Purpose :It keeps track of the given cluster number. Returns the last cluster number. Used to move to the end of the file
Parametrer :
- BASLANGIC_CLUSTER_NUMARASI :Enter the cluster number to start the scan.
Usage :
FAT_SON_BOLGE_BULUCU(100);
Feedback :
- It does not generate an error report.
- Returns the last cluster number.
- System Function
– FAT_BOLGE_TAYIN_EDICI Function
Function : void FAT_BOLGE_TAYIN_EDICI()
Purpose :When the file is created, it assigns the first cluster zone to the file.
Parameter : no
Usage :
FAT_BOLGE_TAYIN_EDICI();
Feedback :
- It does not generate an error report.
- System Function
– FAT_BOLGE_TAYIN_EDICI_KLASOR Function
Function : unsigned long FAT_BOLGE_TAYIN_EDICI_KLASOR()
Purpose :Finds cluster location for the new folder and mark it leaves EOC region.
Parameter : no
Usage :
FAT_BOLGE_TAYIN_EDICI_KLASOR();
Feedback :
- It does not generate an error report.
- Returns the empty cluster number that it finds.
- System Function
3- File Transaction Functions
- Creating new files, changing file contents, deleting files, etc. are done through these functions. The majority are user functions.
– SD_FAT32_DOSYA_OLUŞTUR Function
Function : unsigned char SD_FAT32_DOSYA_OLUSTUR(unsigned char DOSYA_ADI[11])
Purpose : Create a new file
Parameter :
- DOSYA_ADI[11] : The name and extension of the file to be created are written. 8 characters for name and 3 characters for extension. Eg: DOSYA_ADI [“ERCAN TXT”] If the name is less than 8 characters, it must be completed with 8 by spaces. Always be capitalized without using Turkish characters.
Usage :
SD_FAT32_DOSYA_OLUSTUR("ERCAN TXT");
Feedback :
- If it turns 1, it is successful.
- If it turns 255, then the file variation is 99. (to be explained in detail in practice)
- User function
– SD_FAT32_DOSYA_SEC Function
Function : unsigned char SD_FAT32_DOSYA_SEC(unsigned char DOSYA_ADI[11])
Purpose :Selects the file to process.
Parameter :
- DOSYA_ADI[11] : The name and extension of the file to be created are written. 8 characters for name and 3 characters for extension. Eg: DOSYA_ADI [“ERCAN TXT”] If the name is less than 8 characters, it must be completed with 8 by spaces. Always be capitalized without using Turkish characters.
Usage :
SD_FAT32_DOSYA_SEC("ERCAN TXT");
Feedback :
- 1 is successful.
- User function.
– SD_FAT32_DOSYA_KLASOR_SIL Function
Function : void SD_FAT32_DOSYA_KLASOR_SIL()
Purpose :Deletes the selected file or folder.
Parameter : no
Usage :
SD_FAT32_DOSYA_KLASOR_SIL();
Feedback :
- It does not generate an error report.
- User function.
– SD_FAT32_DOSYA_YENIDEN_ADLANDIR Function
Function : unsigned char SD_FAT32_DOSYA_YENIDEN_ADLANDIR(unsigned char DOSYA_ADI[11])
Purpose :Renames the selected file.
Parameter :
- DOSYA_ADI[11] : The name and extension of the file to be created are written. 8 characters for name and 3 characters for extension. Ex: If DOSYA_ADI [“ERCAN2 TXT”] is less than 8 characters, it must be completed with 8 by spaces. Always be capitalized without using Turkish characters.
Usage :
SD_FAT32_DOSYA_YENIDEN_ADLANDIR("ERCAN2 TXT");
Feedback :
- 1 is successful.
- User function
– SD_FAT32_DOSYA_SONUNA_GIT Function
Function : void SD_FAT32_DOSYA_SONUNA_GIT()
Purpose :It goes to the end of the contents of the selected file.
Parameter : no
Usage :
SD_FAT32_DOSYA_SONUNA_GIT();
Feedback :
- It does not generate an error report.
- User function.
– SD_FAT32_DOSYA_BASINA_GIT Function
Function : void SD_FAT32_DOSYA_BASINA_GIT()
Purpose : goes to the beginning of the content of the selected file.
Parameter : no
Usage :
SD_FAT32_DOSYA_BASINA_GIT();
Feedback :
- It does not generate an error report.
- User function.
– SD_FAT32_DOSYA_TARIH_SAAT_AYARLA Function
Function : unsigned char SD_FAT32_DOSYA_TARIH_SAAT_AYARLA(unsigned int YIL,unsigned short AY,unsigned short GUN,unsigned char SAAT,unsigned char DAKIKA )
Purpose :Sets the date and time of the file. Due to the FAT32 system, the file year can not go back to 1980.
Parameter :
- YIL :The year is written with a number. Like 2017
- AY :The month is written in numbers. Like 10
- GUN :The day is written in numbers. – Like 1 (Monday)
- SAAT :It is written on a 24-hour basis. – 23 (evening 11)
- DAKIKA : It is written on a 24-hour basis. – Like 59 (59 minutes)
Usage :
SD_FAT32_DOSYA_ERISIM_TARIH_SAAT_AYARLA(2017,10,6,21,10);// 10 Ekim 2017 saat 21:10
Feedback :
- If it returns 255, there is an error in the writing process.
- User is function.
– SD_FAT32_DOSYA_DEGISIM_TARIH_SAAT_AYARLA Function
Function: unsigned char SD_FAT32_DOSYA_DEGISIM_TARIH_SAAT_AYARLA(unsigned int YIL,unsigned short AY,unsigned short GUN,unsigned char SAAT,unsigned char DAKIKA )
Purpose :Changes the last modification date of the file.
Parameter :
- YIL :The year is written with a number. Like 2017
- AY :The month is written in numbers. Like 10
- GUN :The day is written in numbers. – Like 1 (Monday)
- SAAT :It is written on a 24-hour basis. – 23 (evening 11)
- DAKIKA : It is written on a 24-hour basis. – Like 59 (59 minutes)
Usage :
SD_FAT32_DOSYA_DEGISIM_TARIH_SAAT_AYARLA(2017,10,6,21,10);// 10 October 2017 time 21:10
Feedback :
- If it has returned 255, there is an error in the writing process.
- User function.
– SD_FAT32_DOSYA_LISTELEME Function
Function : unsigned char SD_FAT32_DOSYA_LISTELEME(unsigned int DOSYA_NO)
Purpose :Files in the series;
- Dosya Adı
- Dosya Oluşturma Tarihi
- Dosya Oluşturma Zamanı
- Dosya Boyutunu If lists are requested, all or one of them can be selected. The detail will be explained in the application part.
Parameter :
- DOSYA_NO :Specifies which file to list in the array. If more than one subfolder is requested, this function is fetched in the for loop. It does not see the deleted files according to the function structure and sends the error code by understanding that it is the end.
- Ayrıca kütüphanede bu fonksiyon ile bağlantılı DOSYA_BILGILERI adında yapı tanımlanmıştır.
Usage :
for(i=0;i<10;i++)
   {
     if(SD_FAT32_DOSYA_LISTELEME(i)!=255)
       {
        SAP1024_YAZI_YAZMA(1,(i+2-x),(YDosya_Bilgileri.dosya_adi));
        SAP1024_YAZI_YAZMA(15,(i+2-x),(YDosya_Bilgileri.dosya_olusturma_tarih));
        SAP1024_YAZI_YAZMA(26,(i+2-x),(YDosya_Bilgileri.dosya_olusturma_zaman));
        SAP1024_YAZI_YAZMA(31,(i+2-x),(YDosya_Bilgileri.dosya_boyutu));

       }
   }//note: The detail will be explained in the application section !!!
!
Feedback :
- If it returns 255, there is a deleted file or the end of the files.
- User function.
– SD_FAT32_DOSYA_LISTELEME_SONLANDIR Function
Function : void SD_FAT_32_DOSYA_LISTELEME_SONLANDIR()
Purpose :Used to end the listing process.
Parameter : no
Usage :
SD_FAT_32_DOSYA_LISTELEME_SONLANDIR();
Feedback:
- It does not generate an error report.
- User function
– SD_FAT32_DOSYA_VERI_YAZ Function
Function : unsigned char SD_FAT32_DOSYA_VERI_YAZ()
Purpose : Writes the file (SD_DATA_TAMPON installed – remember from SD card) into the selected file.
Parameter : no
Usage :
SD_DATA_TAMPONU[0]=0X47DC4C41;
SD_DATA_TAMPONU[1]=0X59000000;
SD_DATA_TAMPONU[2]=0;

SD_FAT32_DOSYA_VERI_YAZ();
Feedback :
- If it is 1, writing is successful.
- User function
– SD_FAT32_DOSYA_VERI_OKU Function
Function : void SD_FAT32_DOSYA_VERI_OKU(unsigned long DOSYA_SEKTOR_SAYISI)
Purpose : Reads sector-specific data from file. Because SD_DATA_TAMPONU is 512 bytes. This corresponds to one sector.
Parameter :
- DOSYA_SEKTOR_SAYISI :Selects which sector of the selected file will be read. For example, if a zero value is given, it reads the first sector of the selected file.
- Note :If you want to read the whole file contents, the total size of the file is divided into 512 bytes and it is determined how many sectors it is. The details will be explained in practice.
Usage :
SD_FAT32_DOSYA_VERI_OKU(0);//reads the first sector of the selected file.
Feedback :
- Does not do the error notification.
- User function.
4- Folder Transaction Functions
– SD_FAT32_KLASOR_OLUSTUR Function
Function : unsigned char SD_FAT32_KLASOR_OLUSTUR(unsigned char KLASOR_ADI[8])
Purpose : Creates file
Parameter :The name of the folder to be created is written as 8 characters.
- KLASOR_ADI[8] : The name of the folder to be created is written as 8 characters.
Usage :
SD_FAT32_KLASOR_OLUSTUR("ERCAN5 ");
Feedback :
- If it is 1, writing is successful.
- User function
– SD_FAT32_KLASOR_ICERIK_YAZMA Function
Function : void SD_FAT32_KLASOR_ICERIK_YAZMA(unsigned long CLUSTER_SAYISI)
Purpose : It is used in SD_FAT32_KLASOR_OLUSTUR function. Writes information about the folder to the system.
Parameter :
- CLUSTER_SAYISI :The number of cluster that is assigned to the file.
Usage :
SD_FAT32_KLASOR_ICERIK_YAZMA(YEREL_CLUSTER);
Feedback :
- does not do the error notification.
- System function
– SD_FAT32_KLASOR_SEC Function
Function : unsigned char SD_FAT32_KLASOR_SEC(unsigned char KLASOR_ADI[8])
Purpose :Selects the folder to process.
Parameter :
- KLASOR_ADI[8] :The name of the folder to be selected is written as 8 characters.
Usage :
SD_FAT32_KLASOR_SEC("ERCAN1 ");
Feedback :
- If it is 1, writing is successful.
- User function
– SD_FAT32_KLASOR_YENIDEN_ADLANDIR Function
Function : unsigned char SD_FAT32_KLASOR_YENIDEN_ADLANDIR(unsigned char KLASOR_ADI[8])
Purpose :Renames the selected folder.
Parameter :
- KLASOR_ADI[8] :The new name for the folder is written as 8 characters.
Usage :
SD_FAT32_KLASOR_YENIDEN_ADLANDIR("ERCAN9 ");
Feedback :
- If it is 1, writing is successful.
- User function
– SD_FAT32_KOK_DIZINE_GIT Function
Function : void SD_FAT32_KOK_DIZINE_GIT()
Purpose :Root (root) goes to the directory. The operations to be performed are then performed in the root directory.
Parameter : no
Usage :
SD_FAT32_KOK_DIZINE_GIT();
Feedback :
- does not do the error notification.
- User is function
– SD_FAT32_BIR_DIZIN_YUKARI_GIT Function
Function : void SD_FAT32_BIR_DIZIN_YUKARI_GIT()
Purpose :It goes up one line.
Parameter : no
Usage :
SD_FAT32_BIR_DIZIN_YUKARI_GIT();
Feedback :
- does not do the error notification.
- User function
Application of Functions
- We will see here in more detail the applications of the functions described above.
- I will use the WinHex program again when examining the sectors.
- The purpose of studying the sectors is to give information about the functioning of the FAT32 system, not only on the basis of memorization, but also on the one hand, without teaching the library.
1- Making SD Card Analysis
- We will check whether the SD card is formatted in FAT32 format in the appropriate format, and we will see the result in GLCD.
- Wherever the library is formatted, it is compatible with all systems. In other words, the SD card does not need to be formatted on the circuit. As long as it is formatted in FAT32 format, PC or PIC does not matter, it works in harmony with all of them.
void  main()
{
    unsigned char denetim=120;

    ADCON1=7;
    CMCON=7;

   SAP1024_INIT(240,128,6); // GLCD run code

   do{denetim=SD_SDMOD_ANALIZ(4);}while(denetim==0);//it must be in the very beginning to run the SD card.

   if(SD_FAT32_INIT()==0)//analysis function
     {
       SAP1024_YAZI_YAZMA(1,1,"FORMAT ATILMALI");
     }
   else
     {
       SAP1024_YAZI_YAZMA(1,1,"FORMAT ATILMAMALI");
     }
 }
- At first we called the function SD_SDMOD_ANALIZ if we were going to examine the code. Because first we have to run our SD card.
- We put the SD_FAT32_INIT function in the condition. So if the 0 result is “Format Atılmalı“. If not, we provided “Format Atılmamalı” as well as GLCD.
See the result below.
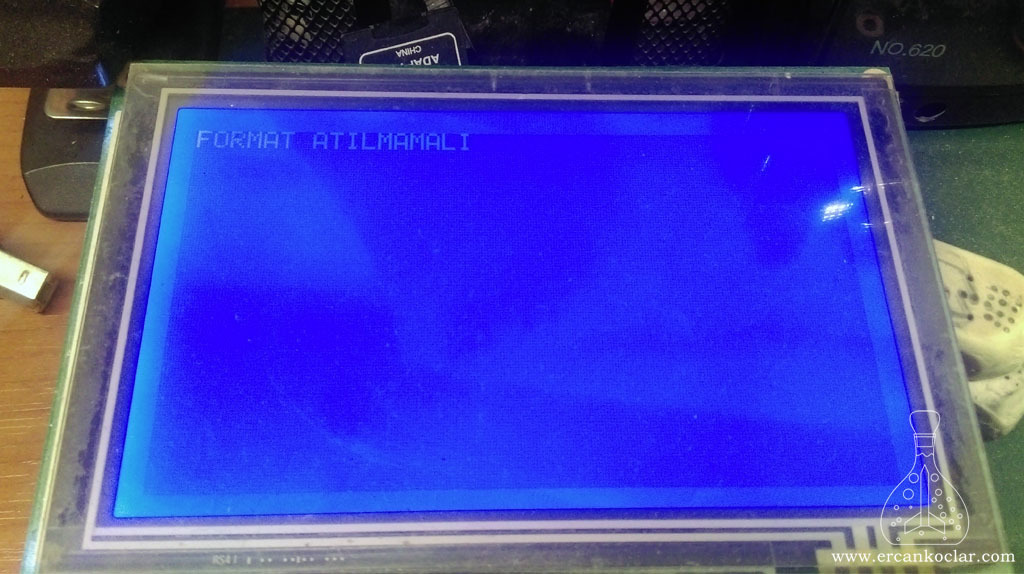
- As we saw in the photo, we mentioned that the SD card is already formatted and does not need formate.
- Depending on whether you have formatted on the circuit, then the SD card may be formatted on the PC. Let’s examine 0th sector of SD card immediately.
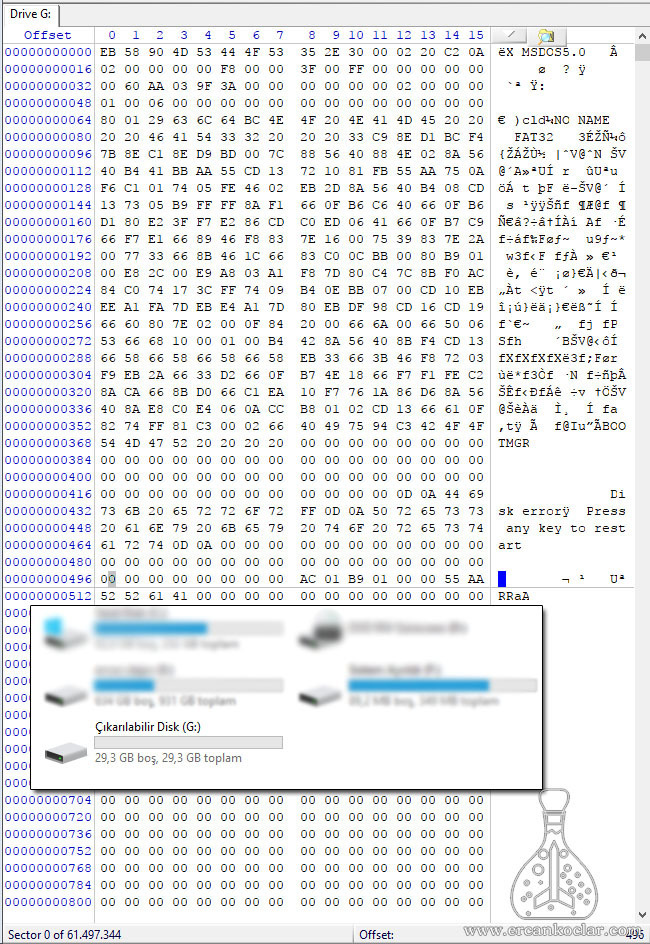
- As seen above, 0th sector of the SD card is filled in by the system that it is formatted and appears as a disk that is also defined on the PC.
- So, to test the library, I’ll delete 0th sector with SD_MOD_SEKTOR_SIL and observe it again.
void  main()
{
    unsigned char denetim=120;

    ADCON1=7;
    CMCON=7;

   SAP1024_INIT(240,128,6); // GLCD run code

   do{denetim=SD_SDMOD_ANALIZ(4);}while(denetim==0);//It must be in the beginning to run the SD card
   do{denetim=SD_MOD_SEKTOR_SIL(0,0);}while(denetim==0);// 0th sector is deleted.

   SAP1024_YAZI_YAZMA(1,1,"bitti");
}
- With the code above, we are deleting 0th sector of the SD card. Then we will apply the analysis codes above and see the result.
void  main()
{
    unsigned char denetim=120;

    ADCON1=7;
    CMCON=7;

   SAP1024_INIT(240,128,6); // GLCD run code

   do{denetim=SD_SDMOD_ANALIZ(4);}while(denetim==0);//It must be in the beginning to run the SD card

   if(SD_FAT32_INIT()==0)//analysis function
     {
       SAP1024_YAZI_YAZMA(1,1,"FORMAT ATILMALI");
     }
   else
     {
       SAP1024_YAZI_YAZMA(1,1,"FORMAT ATILMAMALI");
     }
 }
- The SD card analysis code is shown above. Let’s see the end by re-analyzing our SD card.
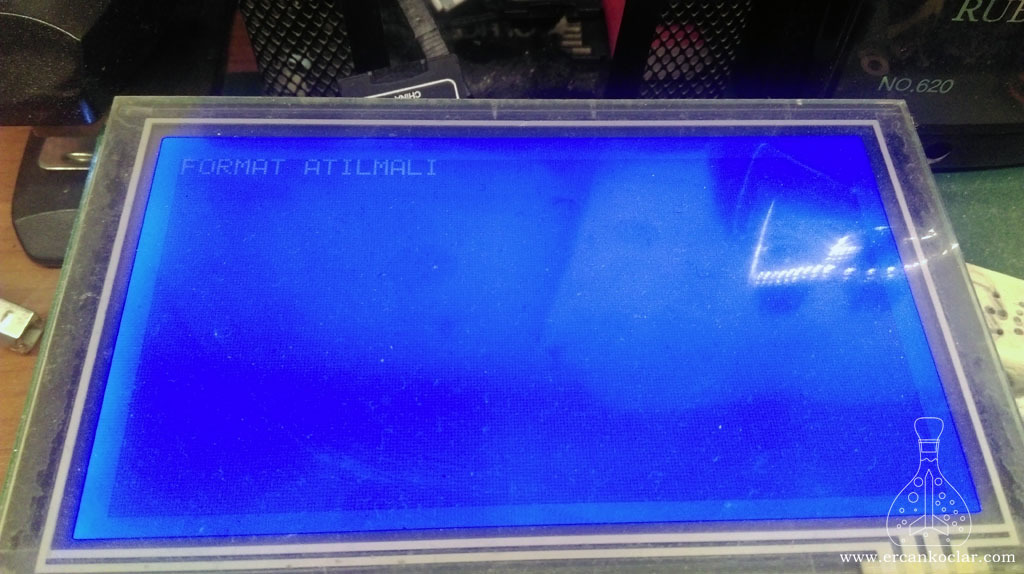
- As you can see in the photo above, this time the function format has to be discarded. Because we deleted 0th sector to make SD card undefined.
- Now you can see again the 0th sector of the SD card 0 and the state of the SD card on PC.
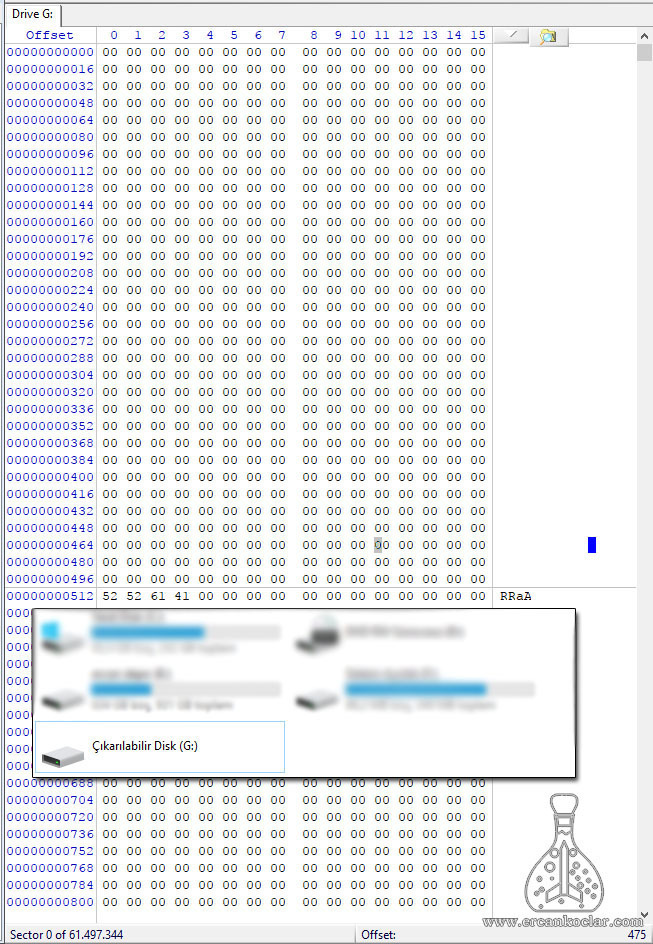
- As seen above, the information in the 0th sector of the SD card was deleted and the card became undefined in the PC environment.
- The function SD_FAT32_INIT directs the user by testing whether the card is formatted as shown
2- Formatting SD Card in FAT32 Format
- In section 1 we deleted the the 0th sector of our SD card, making it undefined. However, we need to redefine the work to continue.
- We will do this on the circuit with the function SD_FAT32_FORMAT. So we will format our SD card on the circuit according to FAT32 format.
- At the same time, I will give the SD card the name “DENEME 1” while doing formatting.
void  main()
{
    unsigned char denetim=120;

    ADCON1=7;
    CMCON=7;

   SAP1024_INIT(240,128,6); // GLCD run code

   do{denetim=SD_SDMOD_ANALIZ(4);}while(denetim==0);//It must be in the beginning to run the SD card
   SD_FAT32_INIT();// analysis function must be called
   do{denetim=SD_FAT32_FORMAT("DENEME 1   ");}while(denetim==0);//Formatting SD CARD

   SAP1024_YAZI_YAZMA(1,1,"bitti");

}
- If we examine the code, we always call the SD_FAT32_INIT function. After this function, we can switch to other FAT32 operations.With the function SD_FAT32_FORMAT, we will format the SD card with the FAT32 system and give the name “DENEME1“. Let’s see the result.
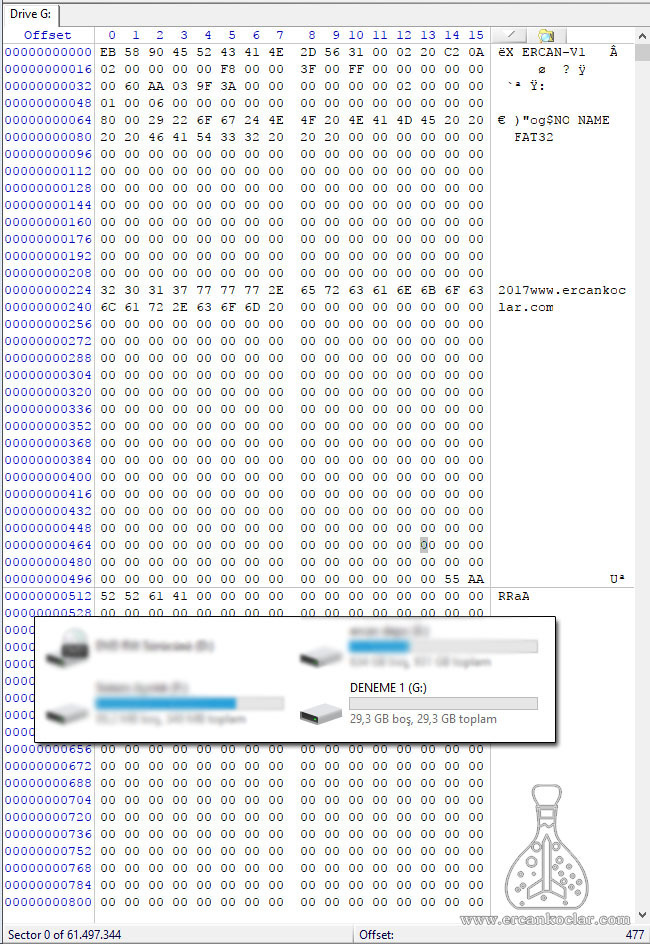
- As we have seen above, the sector 0 of the SD card has received new data. I wrote “2017www.ercankoclar.com” in order to show that my library belongs to me by clearing unnecessary data while writing my own function.
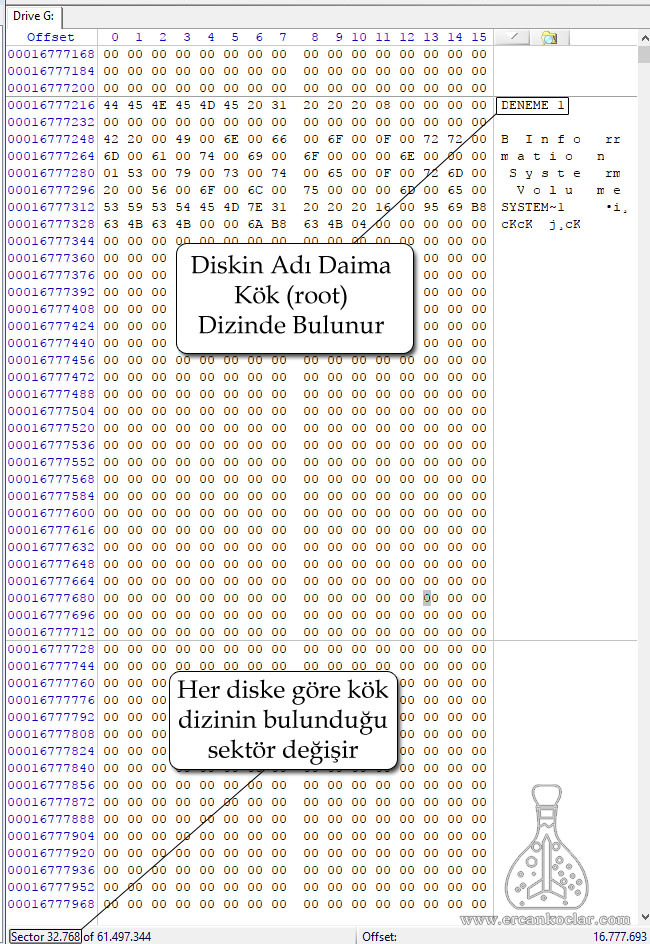
But there is something not seen above. We made the name of the SD card “DENEME1” but could not see it above. - As you will remember from the beginning, in the FAT32 system, the name of the SD card is not in the sector (Boot sector) but in the root directory (root). So let’s look at the root directory for information.
NOTE: If you have problems with formatting, delete all sectors of the SD card (with the SD card sector erase function) and try again. In some cases residual data can lead to instability in the system.
3- File Operations
- In this section, we will see functions such as creating files, deleting files, selecting files, writing data to a file practically.
- Once you have formatted your card, it is ready to process.
3A- File Creation
- The files we create in this section will all be created in the root directory, that is, immediately inside the disk. We will see the subdirectories in the folder section.
- I will create a text file in order to see the data inside it further, but you can create files in the style you want.
- As a starting point, I will create the file “ERCAN4 TXT“. We have 8 characters for the file name and 3 characters for the extension.
- In this section we will use SD_FAT32_DOSYA_OLUSTUR function.
void  main()
{
    unsigned char denetim=120;

    ADCON1=7;
    CMCON=7;

   SAP1024_INIT(240,128,6); // GLCD run code

   do{denetim=SD_SDMOD_ANALIZ(4);}while(denetim==0);//It must be in the beginning to run the SD card

   SD_FAT32_INIT();//FAT32 analysis function must be called

   SD_FAT32_DOSYA_OLUSTUR("ERCAN4  TXT");//file creation function

   SAP1024_YAZI_YAZMA(1,2,"bitti");//added to let you know that the process is over
}
- As usual, we created our file with SD_FAT32_DOSYA_OLUSTUR (“ERCAN4 TXT“) function after the main function SD_FAT32_INIT.
- Now let’s examine this on the PC and in the sectors of the SD card.
- As you remember, the records of the newly created files or folders were in the root directory.
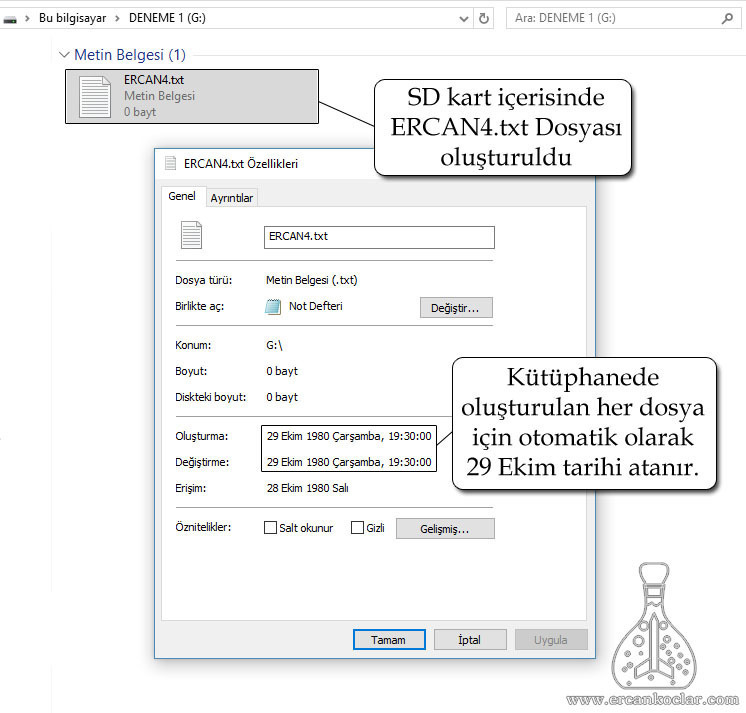
- As you can see above, the ERCAN4.txt file was created in the SD card. However, if the inside is empty, the size is 0 bytes.
- When every file is created in my library, it is automatically assigned on October 29, 1980. The reason for the 1980s will be explained in the section on file operations related to history. There is no need to explain the reason for “October 29”.
- Now let’s examine the changes in the root directory of the SD card
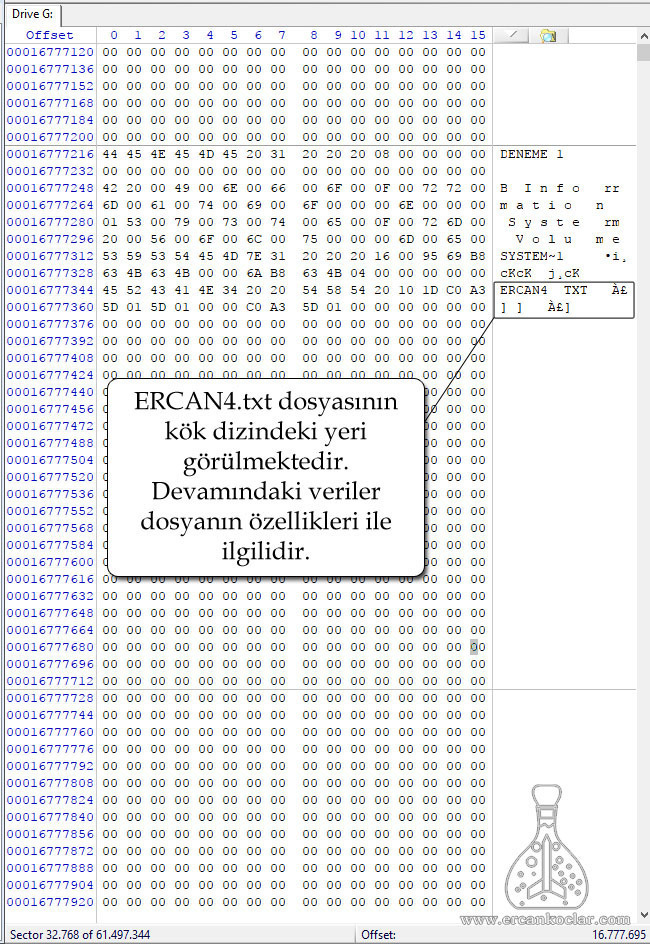
- We did not have any problems when we created a single file. But what if we accidentally create two files of the same name without knowing what is in the SD card or before?
- I will create two ERCAN4.txt files with a new work and see the end result.
void  main()
{
   unsigned char denetim=120;
   ADCON1=7;
   CMCON=7;

   SAP1024_INIT(240,128,6); // GLCD run code

   do{denetim=SD_SDMOD_ANALIZ(4);}while(denetim==0);//It must be in the beginning to run the SD card

   SD_FAT32_INIT();//fat32 main function

   SD_FAT32_DOSYA_OLUSTUR("ERCAN4  TXT");//ercan4.txt created
   SD_FAT32_DOSYA_OLUSTUR("ERCAN4  TXT");//ercan4.txt created

   SAP1024_YAZI_YAZMA(1,2,"bitti");//Notified via GLCD that process is finished.
}
- I created two files with the same name and extension in consecutive order so that they could be understood in the code. Let’s see the result.
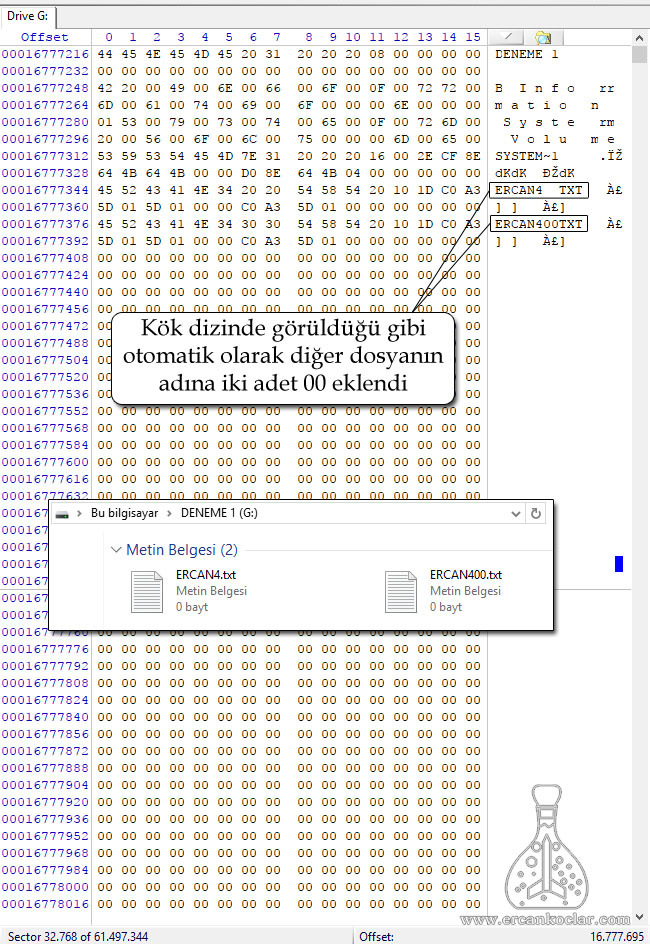
- It did not create two files with the same name as shown above. The name of the second file is ERCAN400.txt, so it added two zeros “00” to the end.
- If you created a new one with the same name, it would do ERCAN401.txt. For this reason a maximum of 99 units can go in the same way. If it exceeds 99, the function will return 255 codes.
3B- Selecting and Deleting Files
- Selecting a file can be thought of as activating it by clicking on a file in PC. Then we can process the file.
- The first thing we see here is selecting a file. But in order to make sense of this, I will also describe how to delete files
- I will do the file selection with the SD_FAT32_DOSYA_SEC function and the file deletion with the SD_FAT32_DOSYA_KLASOR_SIL function.
- When selecting a file, make sure that you type the file name correctly and exactly. Otherwise it will give you the error code 0 (zero).
void  main()
{
    unsigned char denetim=120;
    unsigned char txt[11];
    int ercan;
    ADCON1=7;
    CMCON=7;

   SAP1024_INIT(240,128,6); // GLCD run code


   do{denetim=SD_SDMOD_ANALIZ(4);}while(denetim==0);//It must be in the beginning to run the SD card

   SD_FAT32_INIT();//main function

   SD_FAT32_DOSYA_OLUSTUR("ERCAN5  TXT");//another file has been created

   SD_FAT32_DOSYA_SEC("ERCAN4  TXT");//previously created file has been selected

   SD_FAT32_DOSYA_KLASOR_SIL();//selected file has been deleted

   SAP1024_YAZI_YAZMA(1,2,"bitti");//added to show that the process is over on GLCD

}
- First I created a new file called ERCAN5.txt. This will allow you to see if the selected file has been deleted.
- With SD_FAT32_DOSYA_SEC function, I selected the ERCAN4.txt file I created earlier.
- With SD_FAT32_DOSYA_KLASOR_SIL function I deleted the selected file.
- Now let’s look at the results of both PC and SD card sectors.
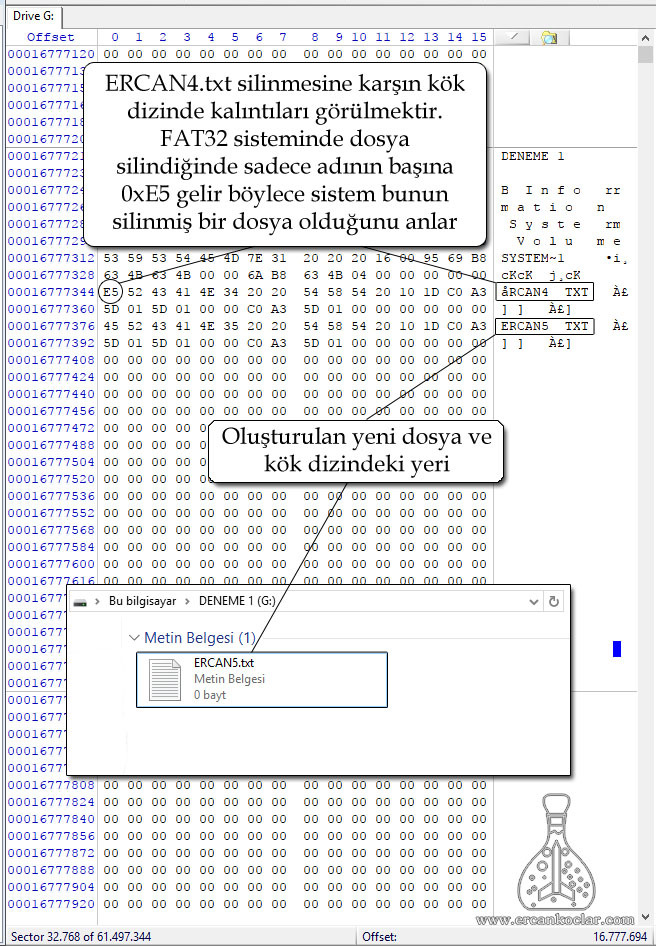
- As you can see above, it seems like the old file is deleted when the old selected file is deleted.
- But when I have to delete the file record completely in the FAT32 system, why does this record stop only put 0xE5 per head?
- Reason is that when you open a non-scanning disk with the FAT32 system root sequence, the root directory is scanned and the files it sees are there, until the last empty row is reached. If we created 5 files and then deleted the first one we created, and if there was no data left, the first line was empty and when we opened the disc we could not see the other 4 files. Because the system will read the root directory and will see the space on the first line and will not make the decision that there are no files on the disk.
- To prevent this, file recording is not deleted on the FAT32 system. The first character is replaced by 0xE5. Next time the system will create a new file at 0xE5, it will not be a problem in terms of floor space.
3C- Rename a file
- First we will select the file we want to process with SD_FAT32_DOSYA_SEC function and then we will give a new name with SD_FAT32_DOSYA_YENIDEN_ADLANDIR function.
- Naming is just like creating a new file, as 8 characters will be 3 character extensions.
- If you select a file, you do not need to select the file again for each process that remains selected until you select another file.
- I will change the name of the ERCAN5.txt file we created earlier to ERCAN10.txt.
void  main()
{
    unsigned char denetim=120;
    unsigned char txt[11];
    int ercan;
    ADCON1=7;
    CMCON=7;

   SAP1024_INIT(240,128,6); // GLCD run code

   do{denetim=SD_SDMOD_ANALIZ(4);}while(denetim==0);//It must be in the beginning to run the SD card

   SD_FAT32_INIT();// fat32 ana fonksiyonu

   SD_FAT32_DOSYA_SEC("ERCAN5  TXT");//I selected the file I created earlier

   SD_FAT32_DOSYA_YENIDEN_ADLANDIR("ERCAN10 TXT");//I changed the file name to ERCAN10

   SAP1024_YAZI_YAZMA(1,2,"bitti");//informs that process is over on GLCD
}
- Since I wanted to change the name of the old ERCAN5.txt file, I selected it with the function SD_FAT32_DOSYA_SEC.
- With the function SD_FAT32_DOSYA_YENIDEN_ADLANDIR (“ERCAN10 TXT“) I have given the name I want to give new.
- Let’s examine the result in both PC and sector dimensions.
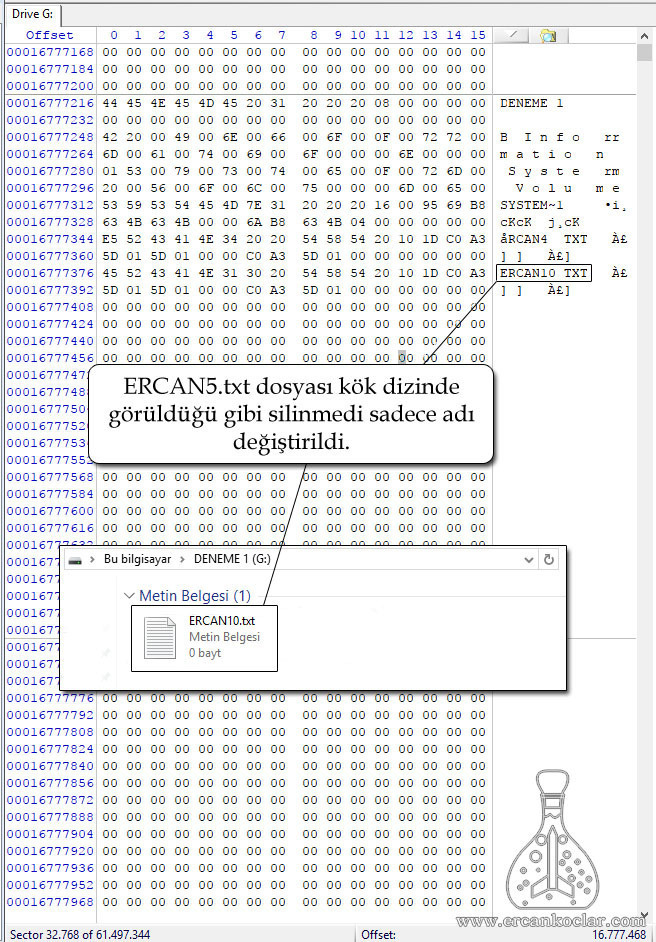
- As we have seen above, the name of the ERCAN5.txt file has been changed to ERCAN10.txt.
- As you can see the root directory will not be deleted file. The name has just been changed and this change has also been seen in PC size.
3D- Changing the Date and Time of a File
- When files were being created, it was automatically taken on October 29, 1980. The reason for the 1980s is that a file on the FAT32 system can be created at least as early as 1980. So in reality there is no date entry. For example, when you write 2 to the date data, the FAT32 system perceives this as 1980 + 2 = 1982. For this reason, 1980 can not go back.
- In this section, I will change the date of the file I created with the function SD_FAT32_DOSYA_TARIH_SAAT_AYARLA to 12:00 on 06 November 2019.
- If you have a date-time clock, you can set the dates of the real-time files by loading the data you receive there. I will make an addition in the future.
void  main()
{
    unsigned char denetim=120;
    ADCON1=7;
    CMCON=7;

   SAP1024_INIT(240,128,6); // GLCD run code

   do{denetim=SD_SDMOD_ANALIZ(4);}while(denetim==0);//It must be in the beginning to run the SD card

   SD_FAT32_INIT();// fat32 ana fonksiyonu

   SD_FAT32_DOSYA_SEC("ERCAN10 TXT");// Which file to process is selected.

   SD_FAT32_DOSYA_TARIH_SAAT_AYARLA(2019,11,6,12,00); // The date is set on November 6, 2019 at 12:00.

   SAP1024_YAZI_YAZMA(1,2,"bitti"); //reports that the process is over on GLCD
}
- As always, we primarily choose the file to be processed. Then we call the function associated with the operation we want to do.
- Now let’s examine the results.
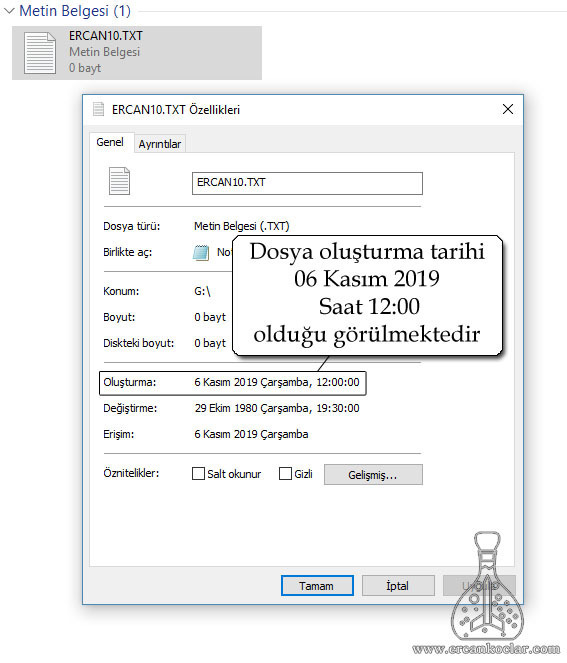
- As you can see, file creation date is November 6th 2019 at 12:00. So we created a file in the future.
- As you may have noticed, the date of change is old-time, and we may need to change it.
- This change is the same as using SD_FAT32_DOSYA_DEGISIM_TARIH_SAAT_AYARLA.
- Let’s try this function. This time I’m going to change the date by November 20th.
void  main()
{
    unsigned char denetim=120;

    ADCON1=7;
    CMCON=7;

   SAP1024_INIT(240,128,6); // GLCD run code

   do{denetim=SD_SDMOD_ANALIZ(4);}while(denetim==0);//It must be in the beginning to run the SD card

   SD_FAT32_INIT();// fat32 main function

   SD_FAT32_DOSYA_SEC("ERCAN10 TXT");// Which file to process is selected.

   SD_FAT32_DOSYA_DEGISIM_TARIH_SAAT_AYARLA(2019,11,20,12,00); // The date was set on November 20, 2019 at 12:00.

   SAP1024_YAZI_YAZMA(1,2,"bitti");//reports that the process is over on GLCD

}
- We have set November 20 to file modification date with SD_FAT32_DOSYA_DEGISIM_TARIH_SAAT_AYARLA .
- Let’s see the result.
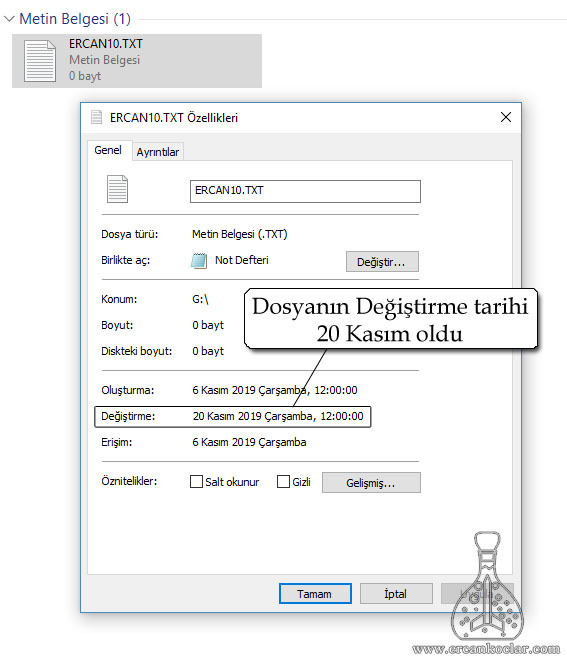
- As you can see above, the replacement date has been set to 20 November.
- This will display the last date you were processing your file.
3E- Data Writing to the File and Data Positioning
- Before I go on writing data to the file, I need to point out some points about the FAT32 system.
- The FAT32 system has zero values (0). But here’s the point to pay attention to; For example in microC we write: ercan = 0; In FAT32 does not make any sense. Because it means zero empty, unused space. If you want to write it as a string rather than zero decimal, then you need to type 0x30. The other way is zero in the FAT32 system as hexadecimal or decimal. We have to make this distinction very well.
- For example: You have a thermometer circuit and the heat is periodically being recorded in a file on the SD card. The measured temperatures are 5,10,15,20 degrees respectively. Now the type of data coming from the sensor and processed in the PIC will be decimal. But if you transfer these decimal values to FAT32 as it is, FAT32 will write these numbers in the sector. It will show you the string equivalents of these numbers. However, you want to read these values in your file. Then you need to write the string equivalents of the decimal values 5,10,15,20.
- We use our SD_FAT32_DOSYA_VERI_YAZ function to write data. But we must first determine the location of the data. If you have opened a new file, please write SD_FAT32_DOSYA_BASINA_GIT function correctly from the beginning of the file.
- At the same time if we want to overwrite any file, if we do not write with SD_FAT32_DOSYA_BASINA_GIT function, the data in that file will be deleted and the new data will be overwritten.
- Now let’s write our codes to understand these and the above discussion a little better.
void  main()
{
    unsigned char denetim=120;

    ADCON1=7;
    CMCON=7;

   SAP1024_INIT(240,128,6); // GLCD run code

   do{denetim=SD_SDMOD_ANALIZ(4);}while(denetim==0);//It must be in the beginning to run the SD card

   SD_FAT32_INIT();

   SD_FAT32_DOSYA_SEC("ERCAN10 TXT");

   SD_FAT32_DOSYA_BASINA_GIT();//The new file is called when data is being written and old files are overwritten.

   //NOT: SD_DATA_TAMPONU it must be called before the data write function. No other function should be inserted.
   SD_DATA_TAMPONU[0]=0x05;//5 değeri
   SD_DATA_TAMPONU[1]=0x0A;//10 değeri
   SD_DATA_TAMPONU[2]=0x0F;//15 değeri
   SD_DATA_TAMPONU[3]=0x14;//20 değeri

   SD_FAT32_DOSYA_VERI_YAZ(); // data writing function

   SAP1024_YAZI_YAZMA(1,2,"bitti");//reports that the process has been finished on GLCD
}
- Absolutely SD_DATA_TAMPON should come just before SD_FAT32_DOSYA_VERI_YAZ. A process or function should never be placed in any way whatsoever. Otherwise, the data may be corrupted.
- Let’s examine the result of the codes below.
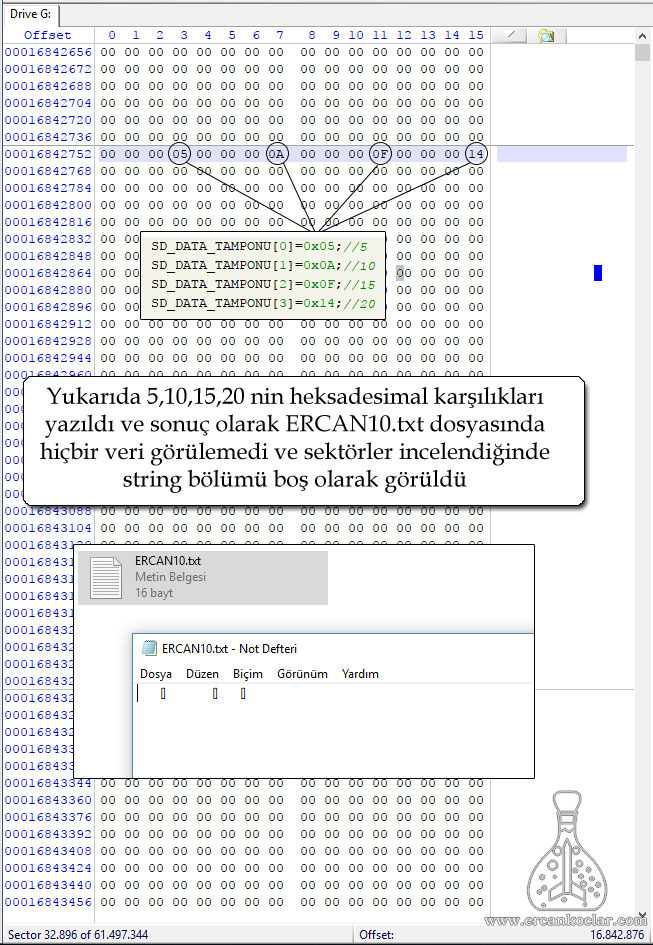
- As we have seen above, when we write values in decimal, we have seen meaningless figures in the file, and when we look at the sector, the decimal values we give are written directly in the sector. However, our aim was to see the number 5,10,15,20 in the file.
- Now we change our codes and write the string equivalents of 5,10,15,20, and then we will run the code again.
void  main()
{
    unsigned char denetim=120;

    ADCON1=7;
    CMCON=7;

   SAP1024_INIT(240,128,6); // GLCD run code

   do{denetim=SD_SDMOD_ANALIZ(4);}while(denetim==0);//It must be in the beginning to run the SD card

   SD_FAT32_INIT();

   SD_FAT32_DOSYA_SEC("ERCAN10 TXT");

   SD_FAT32_DOSYA_BASINA_GIT();//called when data is written to the new file and overwriting the old files

   //NOT: SD_DATA_TAMPONU it must be called before the data write function. No other function should be inserted.
   //NOT2 : 0D0A found at the end of the data corresponds to the enter key in FAT32. So if you write this at the end of the data, the next data will be written on the bottom line in the file.
   SD_DATA_TAMPONU[0]=0x350D0A;//5
   SD_DATA_TAMPONU[1]=0x31300D0A;//10
   SD_DATA_TAMPONU[2]=0x31350D0A;//15
   SD_DATA_TAMPONU[3]=0x32300D0A;//20

   SD_FAT32_DOSYA_VERI_YAZ(); // data writing function

   SAP1024_YAZI_YAZMA(1,2,"bitti");//reports that the process has finished on GLCD
}
- In the above code, we wrote the string equivalents of 5,10,15,20. Also, at the end of the code, we added the 0D0A code, which allows us to pass to the bottom line so that we can see our sub-algebra.
- Now let’s try the code and examine the results
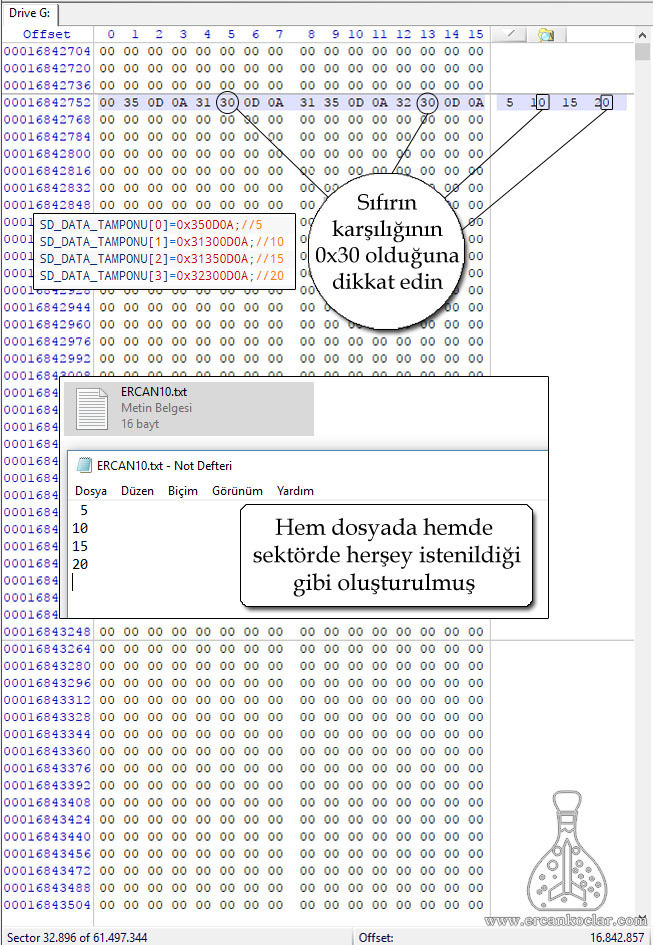
- As you can see above, the data writing process is done as we wish.
- Let’s also do one thing about the translation of data into strings.
- Everything that is written directly in the library string dialing system could be added. But I have released it in terms of making designs suitable for every project that does not restrict the user. Because in any project you wanted to send zero to your SD card, and if I had placed the string loop in the library, it was impossible to do such a thing. For this reason, I do not write a few more lines of code, but I think that this flexibility will save you from limiting other projects.
- Let’s examine the codes now
//*************A STRING CONVERSION FUNCTION START******************//
void string_cevir(unsigned long veri )
    {
      char txt[11];
      unsigned char i=0,x=0,y=0,z=0;

      LongWordToStr(veri,txt);
      SD_DATA_TAMPONU[x]=0;

      for(i=0;i<strlen(txt);i++)
        {
          if(txt[i]!=0 && txt[i]!=0x20)
            {
               SD_DATA_TAMPONU[x]=SD_DATA_TAMPONU[x]|(1L*(txt[i])<<(24-y));
               y=y+8;

               if(y==32)
                 {
                   x++;
                   y=0;
                   SD_DATA_TAMPONU[x]=0;
                 }
             z++;//It helps to keep the number of meaningful data in the sequence.
            }
        }

      // data integrity is provided here
      SD_DATA_TAMPONU[x]=SD_DATA_TAMPONU[x]|(0x20202020>>((z%4)*8));

     if(x!=127){SD_DATA_TAMPONU[x+1]=0;} //son diziyi sıfıra eşitler artık veri kalmasını engeller
    }
//*************END OF TRANSLATION TO STRING FUNCTION******************//

void  main()
{
    unsigned char denetim=120;

    ADCON1=7;
    CMCON=7;

   SAP1024_INIT(240,128,6); // GLCD run code

   do{denetim=SD_SDMOD_ANALIZ(4);}while(denetim==0);//It must be in the beginning to run the SD card

   SD_FAT32_INIT();//fat32 ana fonksiyonu

   SD_FAT32_DOSYA_SEC("ERCAN10 TXT");//the file has been selected

   SD_FAT32_DOSYA_BASINA_GIT();//the positioning was done by going to the top of the file.
   string_cevir(26587);// the string function above main is called and the value to be converted is written
   SD_FAT32_DOSYA_VERI_YAZ();//data was written.

   SAP1024_YAZI_YAZMA(1,2,"bitti");//informs that the process is over on GLCD
}
- As you can see above, SD_DATA_TAMPON u equals zero first. Because there was no zeroing, there should be no more data left.
- With Strlen it is determined how many elements the string array is. So if the data is at 5 or 5555, the string size is determined with strlen and so many loops are created.
- Since the data is written as 8 bits in the txt array, 32 bits are written by shifting SD_DATA_TAMPON into the u sequence and it is done with itself each time.
- To be done with data integrity; if our value is “26587” as above, we need 5 8 bit fields. This means a full array of 32 bits + 8 bits. In other words, the remaining 24 bits are idle and equal to zero. However, 0x00 is undefined in FAT32 and never used in the interval. It disrupts the operation of this system. The translated data is then analyzed. If there are several bits of space, those parts are filled with 0x20 values. The data integrity section does this.
- Finally, the new array and the last array are reset and are no longer saved.
- Let’s look at the results below
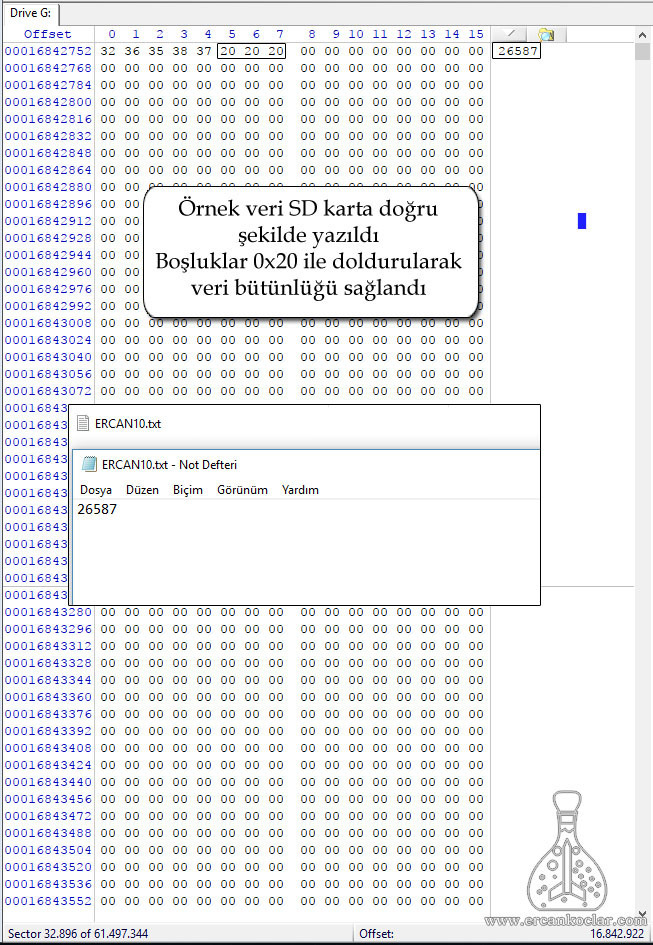
- As you can see above, the data on the SD card was written in the way we wanted it. If the spaces are not filled, it remains 0x00 and causes a failure in subsequent writes.
3F- Writing data by going to the end of the file.
- If we want to make additions to the files we have already created and to which we have written data, we should continue writing data at the end of the file. Otherwise, the file is overwritten and the file is corrupted.
- With the SD_FAT32_DOSYA_SONUNA_GIT function we will go to the end of the file and add it to the file without disrupting the old data.
- Let’s examine the codes
unsigned char x=0;//global value
unsigned char string_cevir(unsigned long veri,unsigned char satir_atla )
    {
      char txt[11];
      unsigned char i=0,y=0,z=0;

      LongWordToStr(veri,txt);//mikroc standard library
      SD_DATA_TAMPONU[x]=0;//the initial sequence is equal to zero.

      for(i=0;i<11;i++)
        {
          if(txt[i]!=0 && txt[i]!=0x20)
            {
               SD_DATA_TAMPONU[x]=SD_DATA_TAMPONU[x]|(1L*(txt[i])<<(24-y));// 8 bitlik veriler kaydırılarak yerleştiriliyor
               y=y+8;

               if(y==32)
                 {
                   if(x!=127) // if the data buffer is not reached at the end
                     {
                       //the new sequence is equal to zero.
                       x++;
                       SD_DATA_TAMPONU[x]=0;
                     }
                   else
                    {
                      return 255 ;//The process has been terminated because the data row is full
                    }
                   y=0;//the data shift variable is reset.
                 }
             z++;// calculates how many meaningful data are.
            }
        }

      if(satir_atla==1)//line jump enter command
        {
          SD_DATA_TAMPONU[x]=SD_DATA_TAMPONU[x]|(0x20202020>>((z%4)*8));// data integration department
          x++;
          SD_DATA_TAMPONU[x]=0x0D0A;//inserts an enter code if line skip is selected

        }
      x++;//shifting new array
}
- I first developed the string conversion function here. First of all, let’s examine this function. The function is added to a new parameter, satir_atla. If this parameter is set to 1, the given subassembly will be set.
- Previously, only one series was loaded and written at a time. However, we have a 127-byte array with 512 bytes, so it will be more logical and sensible to load as many rows as we want and print them at a time, since writing each time is a waste of time. It’s also the fastest way.
- First I assigned global x variables. This will keep track of which array SD_DATA_TAMPONU has left.
- The data goes to the conversion library of the microcontroller and gives us a string string named txt. However, in the direction of the uploaded data, these 10 elementary indexes are not all full. So if we give 5, 9 elements are 0. Only the last element is worth 5. So first we have to distinguish meaningful data from meaningless.
- I used the case for this job and extracted the meaningless data. I canceled the Strlen function. Instead I wrote the full length of the index.
- SD_DATA_TAMPONU is 32 bits and we load SD_DATA_TAMPONU field in 4 groups by shifting each string of our string by 8 bits in each case.
- When a set is full, we go to the next set. If there is a total of 127 arrays if (x! = 127) is seen in the table, if the last sequence is reached, the user is informed that SD_DATA_TAMPONU is now filled by returning 255 codes.
- If all the data operations are completed,if(satir_atla==1) if the user wishes to pass a sub-row, then the operation is performed accordingly. First, the data integration run sequence inserts the next batch of enter code, ie 0x0D0A, so the data from the back appears on the bottom line.
- The last new sequence is passed and the function ends. In this way, the user can fill in the 512 byte field and write in one time by inserting this function in the for loop and giving data to the data parameter in succession. This provides the advantages mentioned above.
- Now we can go through the entire program.
void  main()
{
    unsigned char denetim=120;

    ADCON1=7;
    CMCON=7;

   SAP1024_INIT(240,128,6); // GLCD run code

   do{denetim=SD_SDMOD_ANALIZ(4);}while(denetim==0);//It must be in the beginning to run the SD card

   SD_FAT32_INIT();

   SD_FAT32_DOSYA_SEC("ERCAN10 TXT");

   x=0;// the global array value is reset before each new upload

   SD_FAT32_DOSYA_SONUNA_GIT();//the last written to the end of the file is not corrupted. 26587 is printed.

   //**In this section, loading is done to sequence. It can be uploaded individually if desired.
   //** If it returns 255 from string_cevr, it means SD_DATA_TAMPONU is full.

   string_cevir(145658,1); // turn string got bottom
   string_cevir(1234,1); // turn string got bottom
   string_cevir(458,0);// turn string continue along
   string_cevir(125,1);// turn string got bottom

   SD_FAT32_DOSYA_VERI_YAZ();//data is written

   SAP1024_YAZI_YAZMA(1,2,"bitti");//informs that the process is over on GLCD
 }
- In the main program the file was selected as usual. Global x value equals zero. Because we will install a new one.
- Data is positioned with SD_FAT32_DOSYA_SONUNA_GIT. The previously written data will continue in addition.
- In this phase, SD_DATA_TAMPONU is loaded in succession with the string_cev function and the latest data is written.
- Now let’s examine the results
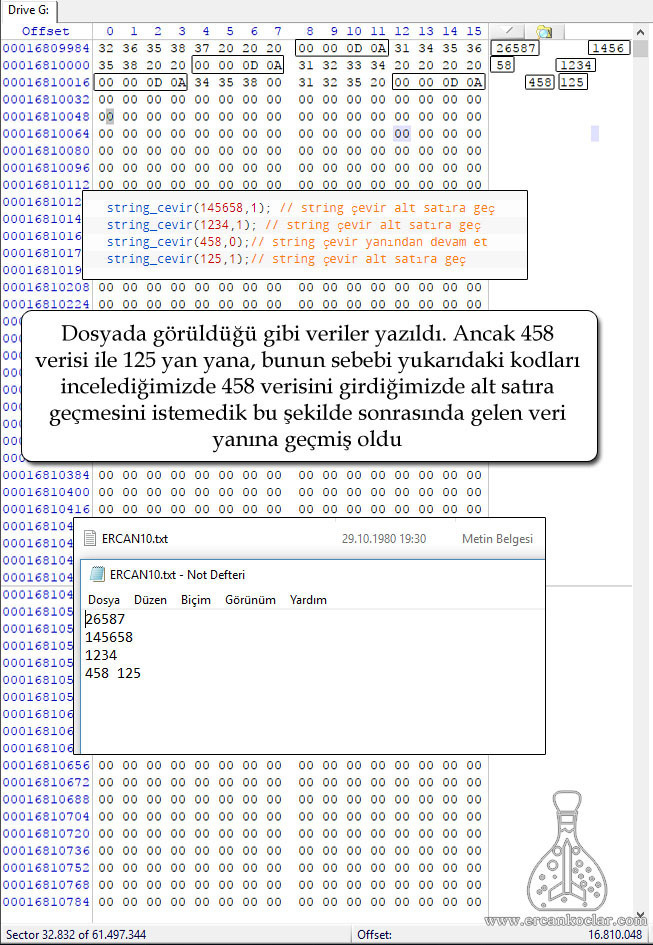
- We have discussed and completed data writing from different angles. It is entirely up to you to use the cycle function or write and develop different functions.
3G- Reading Data from a File
- We will read the data in the files we created on the SD card with the function SD_FAT32_DOSYA_VERI_OKU. SD_FAT32_DOSYA_BASINA_GIT function must be done before reading function. Do not forget to select the file you are going to process.
- When reading, it should be noted that the number of sectors of the file can be read. Each sector is 512 bytes long and the sector is read SD_DATA_TAMPONU is loaded. We can find the data from there.
- Now let’s try to read in the GLCD hexadecimal by reading the data we created in the previous issues.
void  main()
{
    unsigned char denetim=120,i=0;
    unsigned long veri;
    char txt[11];
    ADCON1=7;
    CMCON=7;

   SAP1024_INIT(240,128,6); // GLCD run code


   do{denetim=SD_SDMOD_ANALIZ(4);}while(denetim==0);//It must be in the beginning to run the SD card

   SD_FAT32_INIT();

   SD_FAT32_DOSYA_SEC("ERCAN10 TXT");//the file to be processed is selected

   SD_FAT32_DOSYA_BASINA_GIT();// go to the beginning of the file. this rule never changes

   SD_FAT32_DOSYA_VERI_OKU(0);//0th sector of the file is read.


   for(i=0;i<12;i++)//I did 12 because we used 12 series in previous issues.
      {
        LongWordToHex(SD_DATA_TAMPONU[i],txt);//The MikRec standard library converts values as hexadecimal.
        SAP1024_YAZI_YAZMA(1,(i+1),txt);//it will show every row as a series on GLCD
      }
}
- After the file is selected, the positioning is completed with SD_FAT32_DOSYA_BASINA_GIT. SD_FAT32_DOSYA_VERI_OKU (0) reads sector 0 of the selected file. Data loaded SD_DATA_TAMPONU.
- With the for loop, this data will be converted to hexadecimal and the GLCD will display a series of each line in the future.
- Now let’s examine the results
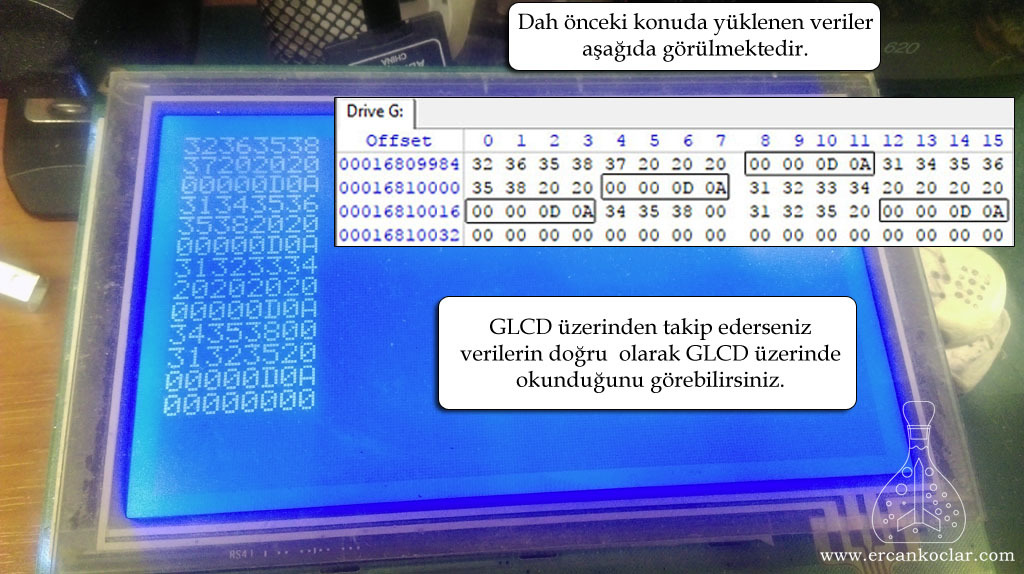
- As you can see above, the result is successful. In the previous issue, the loaded data was read in the GLCD. We have already seen the data shown as a string. (Reading Data from SD Card Sectors), you can convert and read it to string.
3H-Listing the Files in Directory
- This is the same as the MS-DOS command. The files in the selected list are listed regularly in the GLCD.
- We do this by using the function SD_FAT32_DOSYA_LISTELEME. This function will list files and folders in the selected directory. In the future, we will see a list of its contents in whatever folder is selected with the Select Folder command. If no selection is made, the root directory or diskette lists the directories and files.
- The listing is terminated by the function SD_FAT_32_FOCUS_LISTELEME_SONLANDIR.
- Let’s examine it by typing the codes.
void  main()
{
    unsigned char denetim=120,i=0,x=0;
    unsigned long veri;
    char txt[11];
    ADCON1=7;
    CMCON=7;

   SAP1024_INIT(240,128,6); // GLCD run code


   do{denetim=SD_SDMOD_ANALIZ(4);}while(denetim==0);//It must be in the beginning to run the SD card

   SD_FAT32_INIT();//fat32 main function

   for(i=0;i<45;i++)
     {
       if(SD_FAT32_DOSYA_LISTELEME(i)!=255)//listing file function
         {
           SAP1024_YAZI_YAZMA(1,(i+2-x),(YDosya_Bilgileri.dosya_adi));//name of file
           SAP1024_YAZI_YAZMA(15,(i+2-x),(YDosya_Bilgileri.dosya_olusturma_tarih));//file creation date
           SAP1024_YAZI_YAZMA(26,(i+2-x),(YDosya_Bilgileri.dosya_olusturma_zaman));//file creation time
           SAP1024_YAZI_YAZMA(31,(i+2-x),(YDosya_Bilgileri.dosya_boyutu));//file size
         }
      else
         {
           x++;
         }

     }
   SD_FAT_32_DOSYA_LISTELEME_SONLANDIR();//the listing is terminated.
}
- The use of the function is shown above. We have to use it in the for loop. The parameter given to the function SD_FAT32_DOSYA_LISTELEME represents the line in which the file is located. So if you write 1, only the 1st file will be scanned and displayed. For this reason, we use it in the for loop to see all the files.
- I used the printing function of my own GLCD library. You can use the library you want.
- The x parameter can be deleted files while reading the files. For this reason, they will be visible on the screen as a space. However, the function returns 255 values when compared with such deleted files. With this code, the space is deleted by doing -x. This ensures the integrity of the image.
- YDosya_Bilgileri.dosya_adi, YDosya_Bilgileri.dosya_olusturma_tarih, YDosya_Bilgileri.dosya_olusturma_zaman, YDosya_Bilgileri.dosya_boyutu These structures are found in the library. You can use all of them or whatever you like. Whichever GLCD library you use, you need to add them to the writing section.
- The code written as i + 2 allows GLCD to start listing one line at a time rather than at the top. This number can be increased or decreased to set the start of listing. Leaving this gap in the title vs. etc. Writeable. There is no binding or influence.
- The function SD_FAT_32_DOCIA_LISTELEME_SONLANDIR must be called. Zero global values used when listing. If this function is not used, you will get an error if you re-list.
- Now let’s see the result on the GLCD
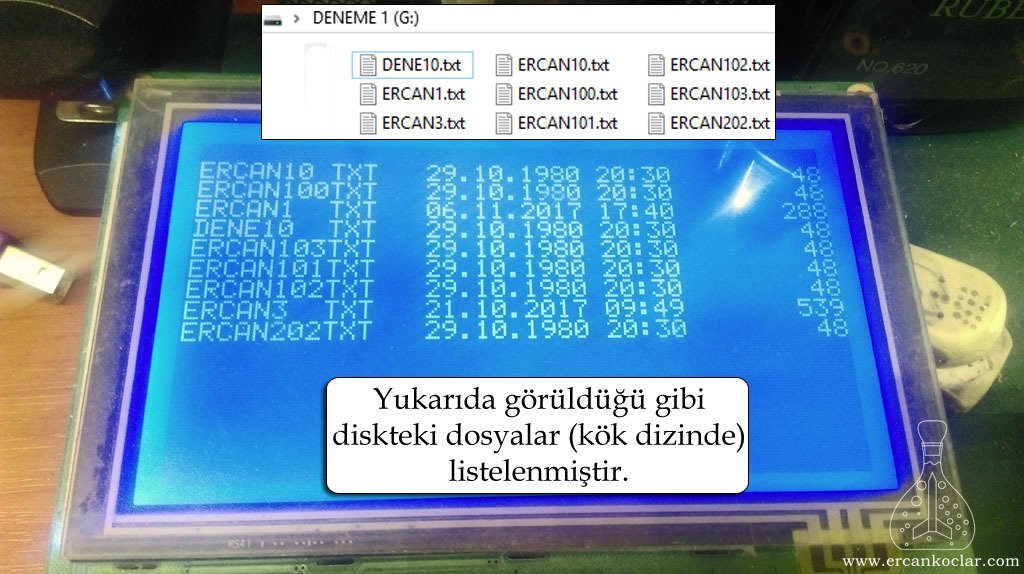
- The files on the disc are listed on the GLCD as seen in the photo. The order of listing is the order of creation in the root directory.
- File name and extension – dates – size is visible. But this does not mislead you. This size is the byte size and the actual size of the file. It is not the size of the disc. At least one cluster (16 Kbytes) will be seen as 1 cluster is allocated in each disk.
- Now let’s examine what kind of situation is in the root sequence.
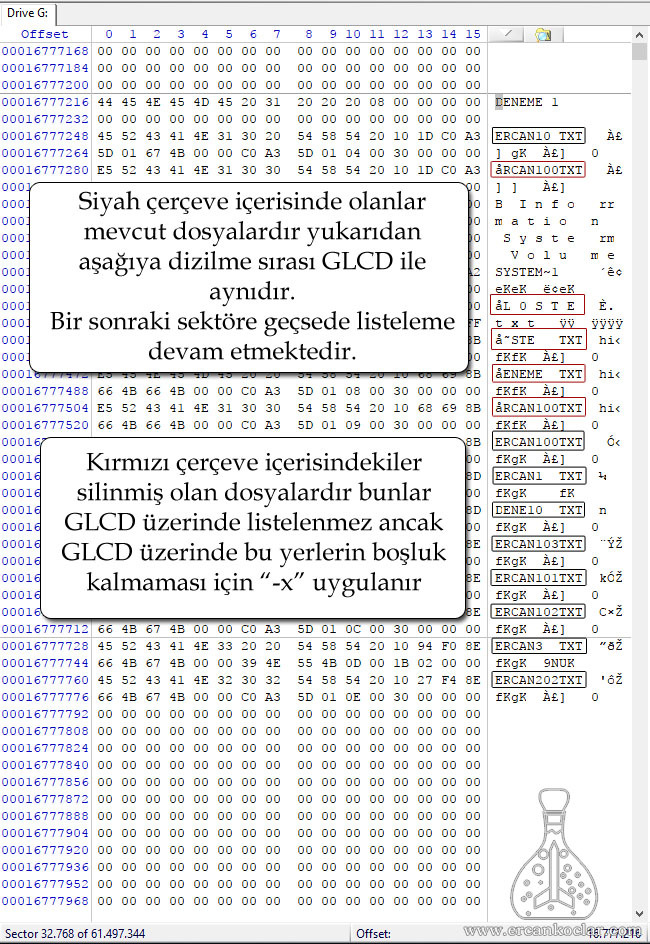
- The GLCD sequence is the same as the sequence in the sector.
- Deleted files and system related data are not displayed in GLCD. To avoid gaps, use -x, which I mentioned in the above code snippet.
- Since no folders are selected at this time, the files in the root directory are listed. How to work with the folder will also be shown in the future when the folder is selected.
4-Folder Operations
- In this section we will create folders, move through folders, go to subdirectory and go to parent directory.
4A-Folder Creation
- We will create a folder using SD_FAT32_KLASOR_OLUSTUR (unsigned char KLASOR_ADI [8]).
- As you can see from the parameter, the folder name can be 8 characters.
- Let’s examine the codes
void  main()
{
    unsigned char denetim=120;
    ADCON1=7;
    CMCON=7;

   SAP1024_INIT(240,128,6); // GLCD run code

   do{denetim=SD_SDMOD_ANALIZ(4);}while(denetim==0);//It must be in the beginning to run the SD card

   SD_FAT32_INIT();//fat32 main function

   SD_FAT32_KLASOR_OLUSTUR("ERCAN5  ");//create a folder named ERCAN5 in the root directory

   SAP1024_YAZI_YAZMA(1,1,"bitti");//informs that process is over on GLCD
}
- SD_FAT32_KLASOR_OLUSTUR (“ERCAN5“) function created a folder in the root directory. No directory selection is possible because it is in the root directory.
- Folders are created like files in the root directory. It only has extensions and dimensions.
- Before proceeding to the results, I reformatted the SD card to clean the root directory and created ERCAN10.txt and ERCAN100.txt files.
- Now let’s see the result
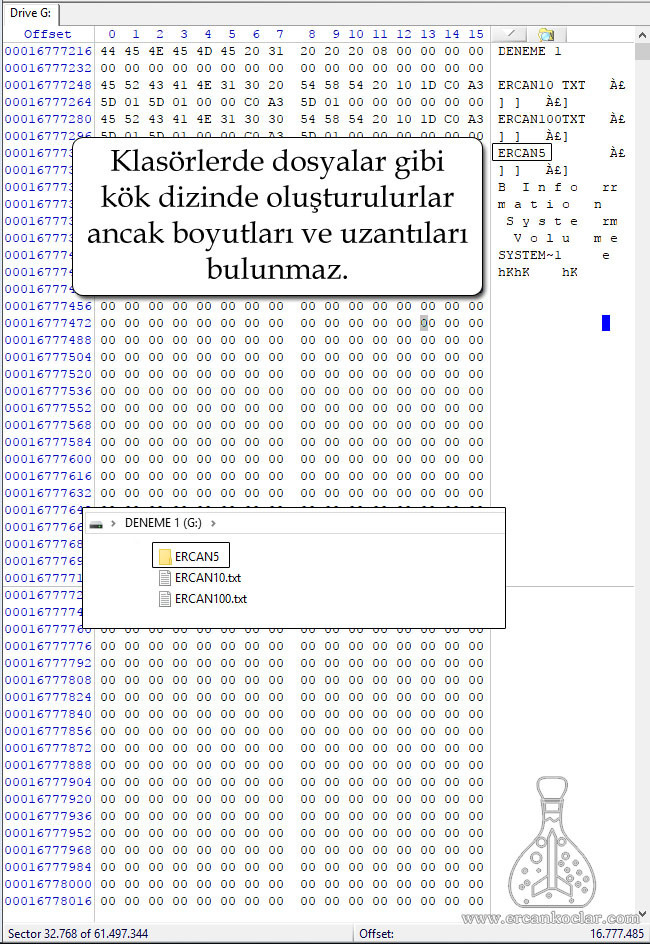
- In the above sector there are some meaningless writings after files and folders. These are the SD cards that the PC adds to itself.
4B- Folder Selection Processes
- We use the function SD_FAT32_KLASOR_SEC (unsigned char KLASOR_ADI [8]) to select the folder as if it were created.
- Folder selection differs from file selection in different situations. I have mentioned a few issues that arise from the index ratios here.
- In the past we created a folder named ERCAN5. However, we created this folder in the root directory. Now we will create ERCAN50.txt file and ERCAN50 folder by choosing ERCAN5 folder to recognize directory partition.
- Let’s examine the codes.
void  main()
{
    unsigned char denetim=120;
    ADCON1=7;
    CMCON=7;

   SAP1024_INIT(240,128,6); // GLCD run code

   do{denetim=SD_SDMOD_ANALIZ(4);}while(denetim==0);//It must be in the beginning to run the SD card

   SD_FAT32_INIT();//fat32 main function

   SD_FAT32_KLASOR_SEC("ERCAN5  ");//The ERCAN5 folder we created is selected. Thus, the files to be newly created will be stored in this folder.

   SD_FAT32_KLASOR_OLUSTUR("ERCAN50 ");//Creates a new folder named ERCAN50.
   SD_FAT32_DOSYA_OLUSTUR("ERCAN50 TXT");//Creates a new file named ERCAN50.txt.

   SAP1024_YAZI_YAZMA(1,1,"bitti");//it informs us via GLCD that the process is over.
}
- We selected the ERCAN5 folder we created previously. So we will create new ERCAN50 folder and ERCAN50.txt file in ERCAN5 folder instead of root directory.
- Let’s see results
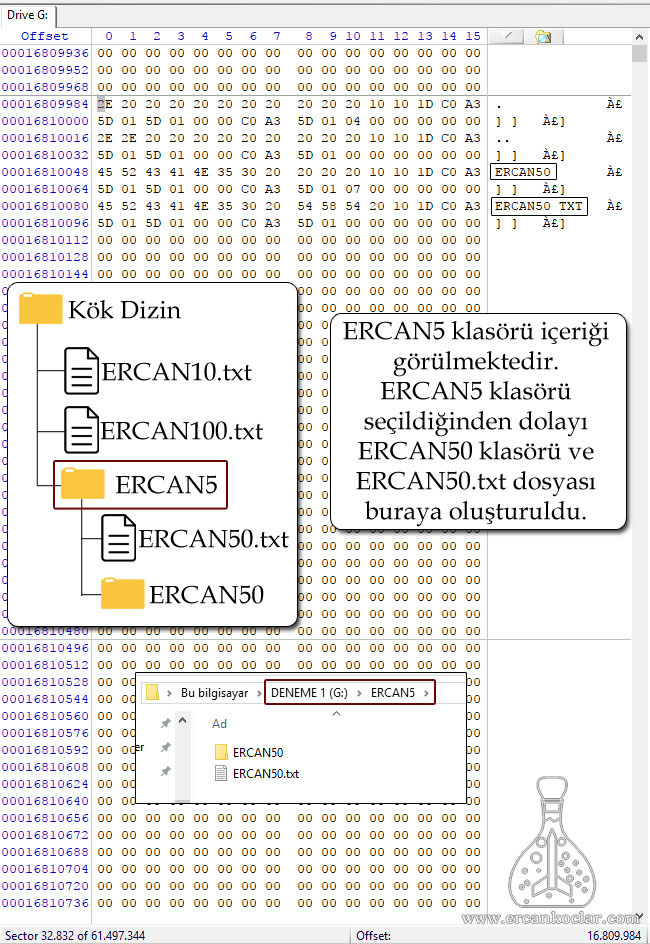
- As you can see, the ERCAN5 folder has been selected. New files and folders were created in the ERCAN5 folder.
- As mentioned earlier, as the ERCAN5 folder is selected, you can see the contents of the ERCAN5 folder instead of the root directory with the function SD_FAT32_DOSYA_LISTELEME on GLCD.
void  main()
{
    unsigned char denetim=120,i=0,x=0;
    ADCON1=7;
    CMCON=7;

   SAP1024_INIT(240,128,6); // GLCD run code


   do{denetim=SD_SDMOD_ANALIZ(4);}while(denetim==0);//It must be in the beginning to run the SD card

   SD_FAT32_INIT();//fat32 main function

   SD_FAT32_KLASOR_SEC("ERCAN5  ");//The ERCAN5 folder has been selected.

   for(i=0;i<45;i++)
     if(SD_FAT32_DOSYA_LISTELEME(i)!=255)//The contents of the ERCAN5 folder will be listed
       {
        SAP1024_YAZI_YAZMA(1,(i+2-x),(YDosya_Bilgileri.dosya_adi));
        SAP1024_YAZI_YAZMA(15,(i+2-x),(YDosya_Bilgileri.dosya_olusturma_tarih));
        SAP1024_YAZI_YAZMA(26,(i+2-x),(YDosya_Bilgileri.dosya_olusturma_zaman));
        SAP1024_YAZI_YAZMA(31,(i+2-x),(YDosya_Bilgileri.dosya_boyutu));
       }
     else
       {
        x++;
       }
    }
   SD_FAT_32_DOSYA_LISTELEME_SONLANDIR();//list ending function
}
- It is the same as the listing code we have seen before. The only difference is that with SD_FAT32_KLASOR_SEC (“ERCAN5“) we have listed the contents of the ERCAN5 folder instead of the root directory.
- Let’s examine the results
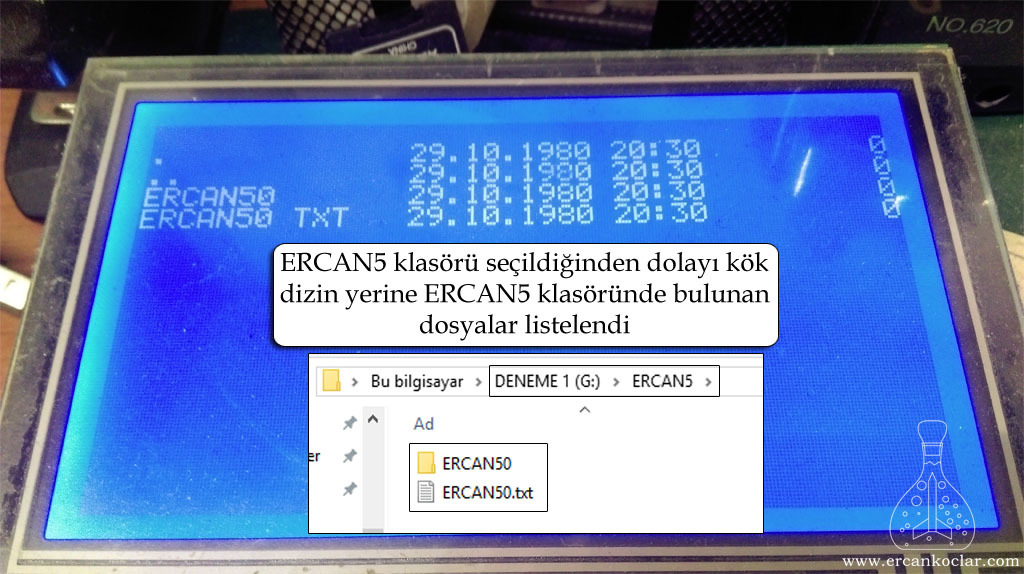
- Choosing and creating folders can go on forever. So you can create a new folder a, select it, create a folder b, select it and create a folder c to create a number of directory chains.
- Now, with a new example, I will first select the ERCAN5 folder, then select the ERCAN50 folder and create a file called SON.txt.
void  main()
{
    unsigned char denetim=120;
    ADCON1=7;
    CMCON=7;

   SAP1024_INIT(240,128,6); // GLCD run code

   do{denetim=SD_SDMOD_ANALIZ(4);}while(denetim==0);//It must be in the beginning to run the SD card

   SD_FAT32_INIT();//fat32 main function

   SD_FAT32_KLASOR_SEC("ERCAN5  ");//the ERCAN5 folder in the root directory was selected first

   SD_FAT32_KLASOR_SEC("ERCAN50 ");//The ERCAN50 folder in the ERCAN5 folder is selected

   SD_FAT32_DOSYA_OLUSTUR("SON     TXT");//SON.txt was created in the ERCAN50 folder

   SAP1024_YAZI_YAZMA(1,1,"bitti");//informs that the process is over on GLCD
}
- As shown above, the selection was made as ROOT DISTINCTION> ERCAN5> ERCAN50. Then the file creation process is done, so the new file needs to be created in ERCAN50 folder.
- In this case, each operation will be applied to the ERCAN50 folder. For example, if ERCAN5.txt file is found in the root directory, delete ERCAN5.txt file in this case will give you the error code because the file can not be found. For this reason, whatever sequence we are doing is related to that directory.
- Now let’s examine results
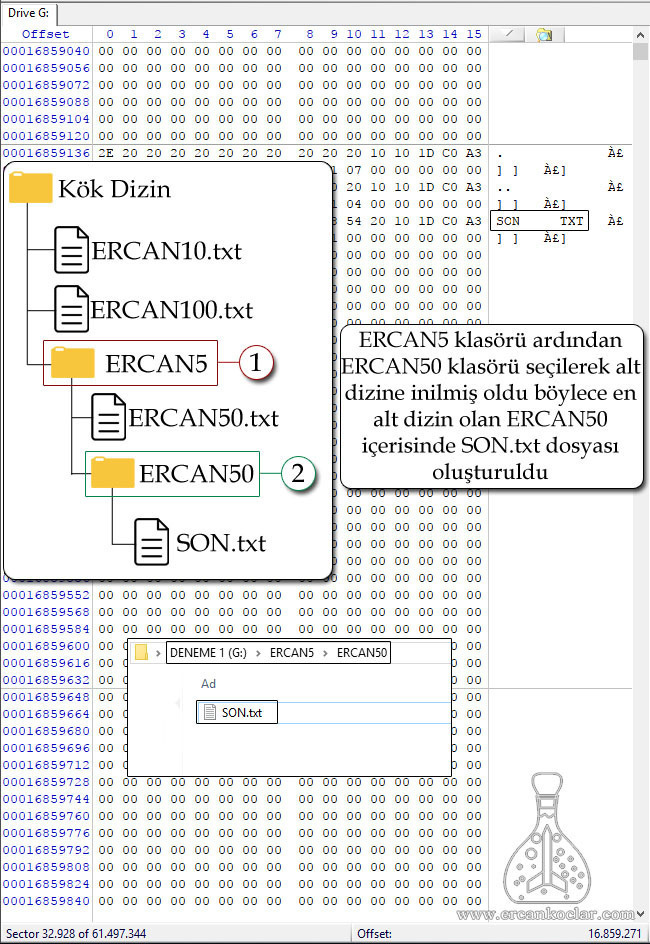
4C- Going Up a Directory
- We went down the directories in the previous topic. In this regard, we will see to go up one by one. So we’re going to have a folder upstairs.
- I will use the SD_FAT32_BIR_DIZIN_YUKARI_GIT function to delete the ERCAN50.txt file from the ERCAN50 folder (we will have entered the ERCAN5 folder).
- Let’s examine the codes.
void  main()
{
    unsigned char denetim=120;
    ADCON1=7;
    CMCON=7;

   SAP1024_INIT(240,128,6); // GLCD run code

   do{denetim=SD_SDMOD_ANALIZ(4);}while(denetim==0);//It must be in the beginning to run the SD card

   SD_FAT32_INIT();

   SD_FAT32_KLASOR_SEC("ERCAN5  ");//ERCAN5 folder was selected
   SD_FAT32_KLASOR_SEC("ERCAN50 ");//ERCAN50 folder was selected

   SD_FAT32_BIR_DIZIN_YUKARI_GIT();//a directory was moved up and returned to the ERCAN5 folder.

   SD_FAT32_DOSYA_SEC("ERCAN50 TXT");//ERCAN50.txt was selected
   SD_FAT32_DOSYA_KLASOR_SIL();//ERCAN50.txt was deleted

   SAP1024_YAZI_YAZMA(1,1,"bitti");//informs that the process is over on GLCD
}
- First of all, the bottom directory is descended and then a directory is moved up to select ERCAN50.txt in the ERCAN5 folder and deleted.
- Let’s examine the results
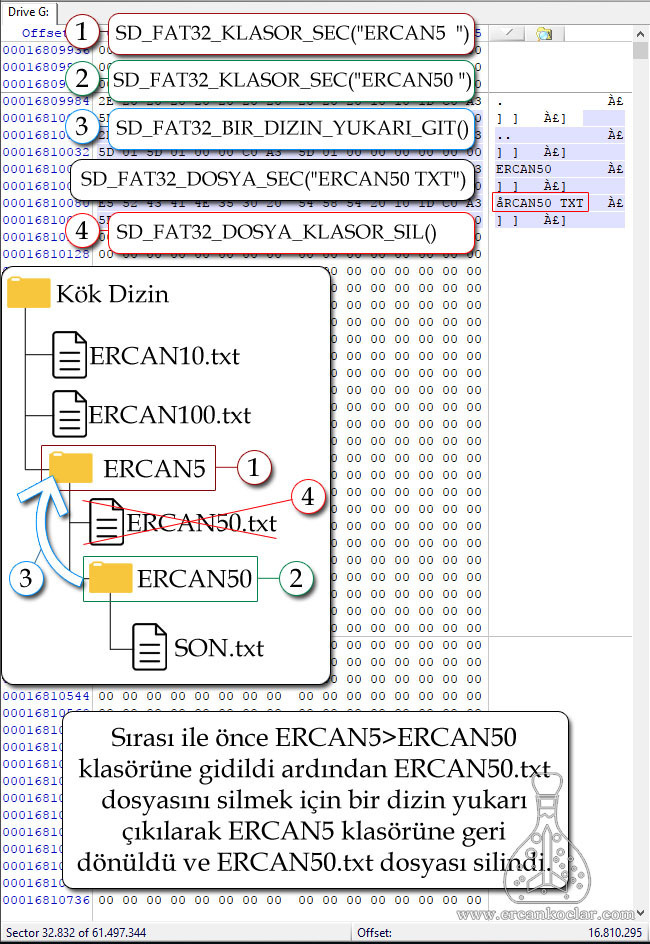
- It is also read from the sector where ERCAN50.txt located in ERCAN5 folder is deleted.
- You can only process files in the folder or directory you are in. In a different situation you will get the error code.
4D- Return to Root Directory
- We saw the previous topic go up in individual indexes. However, we may need to return to the root directory between the nested indexes at the very top. For this reason I wrote this function.
- With the SD_FAT32_KOK_DIZINE_GIT function, you will immediately go back to the root directory wherever you are.
- In this work I will also delete folders. I will do the deletion with the SD_FAT32_DOSYA_KLASOR_SIL common function we have seen before.
- Let’s examine the codes
void  main()
{
    unsigned char denetim=120;
    ADCON1=7;
    CMCON=7;

   SAP1024_INIT(240,128,6); // GLCD run code

   do{denetim=SD_SDMOD_ANALIZ(4);}while(denetim==0);//It must be in the beginning to run the SD card

   SD_FAT32_INIT();//fat32 main function

   SD_FAT32_KLASOR_SEC("ERCAN5  ");//ERCAN5 folder was selected
   SD_FAT32_KLASOR_SEC("ERCAN50 ");//ERCAN50 folder was selected

   SD_FAT32_KOK_DIZINE_GIT();//Directly back to the root directory.

   SD_FAT32_KLASOR_SEC("ERCAN5  ");//ERCAN5 folder was selected

   SD_FAT32_DOSYA_KLASOR_SIL();//The ERCAN5 folder in the root directory has been deleted.

   SAP1024_YAZI_YAZMA(1,1,"bitti");//informs that the process is over on GLCD
}
- The program was downgraded to the bottom level with the test purpose, and then turned to root by the command SD_FAT32_KOK_DIZINE_GIT.
- The ERCAN5 folder in the root directory has been selected and deleted.
- Let’s examine the results
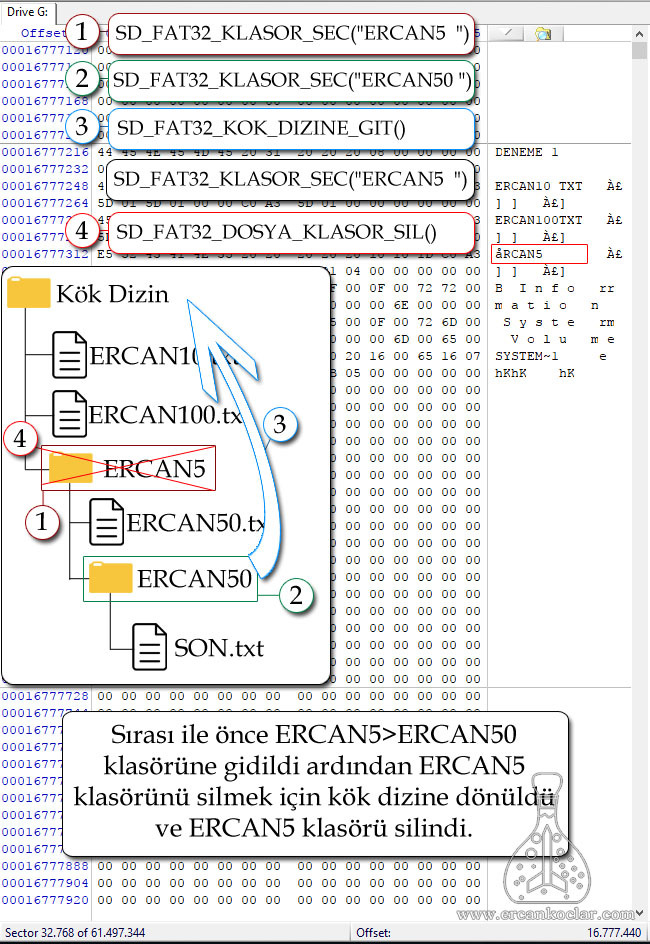
- As you can see above, the root directory has come up and the ERCAN5 folder in the root directory has been deleted. If a folder is deleted, everything in that folder becomes undefined together with it. However, SD card continues to maintain its place among the sectors.
- Although the SD_FAT32_DOSYA_KLASOR_SIL function is common, it deletes whatever was last selected. That is, if a file is selected, it deletes the last folder if it or the folder is selected.
4E- Renaming the folder
- When renaming folders, such as renaming files, we first choose the folder. Then we rename it.
We perform the operation using the function SD_FAT32_KLASOR_YENIDEN_ADLANDIR (unsigned char KLASOR_ADI [8]). - The folder name must be 8 characters. We need to be in the directory where the folder to select is selected. We can not perform operations on files and folders in different arrays.
- There are ERCAN5 and ERCAN500 folders in the root directory. I will give the ERCAN500 folder name SON by working.
void  main()
{
    unsigned char denetim=120;
    ADCON1=7;
    CMCON=7;

   SAP1024_INIT(240,128,6); // GLCD run

   do{denetim=SD_SDMOD_ANALIZ(4);}while(denetim==0);//It must be in the beginning to run the SD card

   SD_FAT32_INIT();//fat32 main function

   SD_FAT32_KLASOR_SEC("ERCAN500");// ERCAN500 folder was selected

   SD_FAT32_KLASOR_YENIDEN_ADLANDIR("SON     ");//ERCAN500 folder was renamed as SON

   SAP1024_YAZI_YAZMA(1,1,"bitti");//informs that the process is over on GLCD
}
- No directory operation was performed because the folder is in the root directory.
- First the ERCAN500 folder was selected. It was then renamed with the function SD_FAT32_KLASOR_YENIDEN_NUMBER (“SON“).
- Let’s see the results.
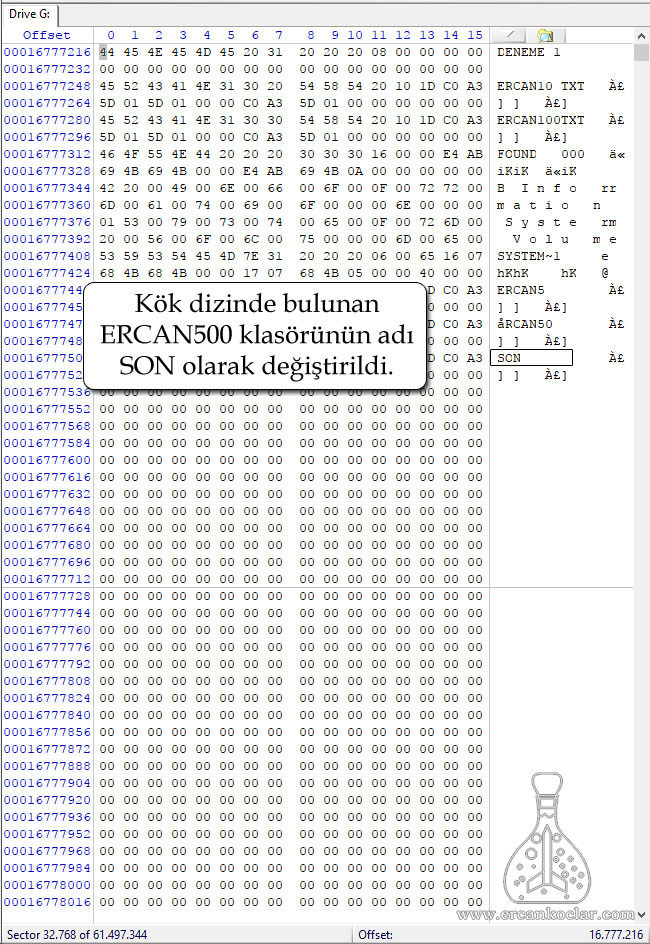
- As seen above the renaming process has been completed.
RESULT
- You have information about the use of functions in the SD card (SD Mode) and the FAT32 library, and also for the SD card and the FAT32 system.
- This library is completely original and will be developed over time.
- With this library you will be able to install and use a fast, full file system using SD card and FAT32. You are now freed from chains like SPI that slow you down.
- I spent 22 months in the library. The approximate finished line of code is around 4000.
- Codes are available. However, for now, their content will not be visible. But when the time comes, it will be published as open source with all my libraries.
- You can use the question-answer forum for questions and notifications.
Library Files
Documents Taken
-
SD card documents
- SD Specifications Part 1 PHYSICAL LAYER -ANA KAYNAK
- SD_Kart_Programlama_Klavuzu
- TOSHIBA SD Card Specification
- TMS320C674xOMAP-L1x Processor Multimedia Card (MMC) Secure Digital (SD) Card Controller
- SPI nterface üzernden SD Card çalışması
- SLC Industrial microSD Memory Card
- Simplified_SDIO_Card_Type_A_Spec_for_Bluetooth
- Simplified_SDIO_Card_Spec
- Simplified_SD_Host_Controller_Spec
- SD_Physical_Layer_Spec
- Secure Digital Card Interface for the MSP430
- SDMMC Bootloader Specificatio
- SD4-4GB-Kingston
- SD_SDIO_specsv1
- SD Specifications Part E7 Wireless LAN Simplified Addendu
- SD Specifications Part 1 UHS-II Simplified Addendum
- SD Specifications Part 1 Physical Layer Simplified Specification
- SD Specifications Part A1 Advanced Security SD Extension Simplified Specification
- SD Specifications Part A2 SD Host Controller Simplified Specification
- SD Specifications Part E1 SDIO Simplified Specificatio
- SD Specifications Part E7 iSDIO Simplifed Specificatio
- Samsung SD & MicroSD Card product family
- SanDisk-SDSDH-2048-datasheet
- SanDisk Secure Digital Card
- SD Card Specification
- SD CARD
- SD Flash Controller Using SD Bus
- SD InputOutput (SDIO) Card Specification
- Lecture 12 SPI and SD cards
- Laboratory Exercise 9
- Lesson 09 SD Card Interface
- Lost Password to MicroSD Card
- microsd_card-spec
- MMC SD MEMORY CARD FAT16 FAT32 DRIVER
- S-40_data_sheet_SD-LxBM_Rev080-317981
- Activating New Mobile Services and Business Models with smartSD Memory cards
- A New Method of High Speed P2P File Transfer using SD Card and TransferJet Technology
- An Introduction To SD Card Interface
- Capacity (SDSDHCSDXC)
- How to Use MMCSDC
- InnoDisk Industrial SD Card Datasheet
- Interfacing SD Cards with Blackfin® Processors
-
FAT32 Documents
- Microsoft Extensible Firmware Initiative FAT32 File System Specification -ANA KAYNAK
- Her yönüyle FAT32 – Barış Samancı
- FAT16 – SD kartdaki dosyaları okumak
- FAT32 Dosya Sistemi
- Emre Supçin – Kişisel Blog _ FAT Dosya Sistemi Nedir_
- Sun’s Network File System (NFS)
- The FAT File System
- The FAT File System2
- Transaction Support in a Log-Structured File System
- Understanding file system – My Hobbies
- Volume and File Structure of Disk Cartridges for Information Interchange
- FAT32 is made for data-intensive embedded application
- FAT32 Boot Sector, Locating Files and Dirs
- file allocation table – 16bit
- File Allocation Table
- File System Implementation
- [CS 111] Spring ’12 Scribe Notes ‐ File Systems
- 56_FAT_Part2_TOC
- Enabling Transactional File Access via Lightweight Kernel Extensions
- Extending ACID Semantics to the File System
